How to save contacts to a Samsung flash drive. How to transfer contacts from phone to SIM card
Transferring contacts from the phone book from an Android phone to another Android smartphone is a hot topic. Sooner or later, every owner of an Android smartphone or tablet is forced to change the device for a number of reasons: the appearance of a new device, switching to another model, or buying a second device for work purposes. And then there is a need to transfer contacts from one device to another.
In this article, we will look at several simple and common ways to transfer contacts from Android to Android phone. We will also look at the features, advantages and disadvantages of each method.
Synchronization using Google account
The first and easiest way to transfer contacts from Android to Android is to synchronize your Google account. The method will allow you to quickly transfer your telephone database from one device to another without any extra effort. This is also true if the directory contains a large database. Not suitable if you only need to transfer some contacts.
The instructions consist of a couple of simple steps:
- On your old Android device, add or create a Google account. If the account is present, skip the action and move on to the next step.
- Synchronize your phone book using your Google account. To do this, you need to go to the device settings menu, open your Google account, and then select “contacts” and synchronize phone numbers.
- On a new Android smartphone or tablet, add the same google account as on the old device, and then synchronize the data. All your contacts and phone numbers will appear in the directory automatically.
Note!
When performing the operation, access to mobile or wireless Internet is required, otherwise you will not be able to transfer contacts. Internet speed also affects the data synchronization time, on average 5-15 seconds, and sometimes up to one minute.

Main advantages:
- The method is simple and also requires a minimum of effort and time.
- Complete transfer of Android contacts to Android phone.
- Allows you to do without a computer.
- Convenient if the phone book contains many numbers.
Main disadvantages:
- You cannot synchronize contacts without the Internet.
- The method is not suitable if Google services are missing or not working on one of the devices.
- No selective porting of phone numbers.
- Number confusion if the account was previously synchronized with the contacts of another device.
Import/export phone book
You can transfer contacts from phone to phone by exporting the phone book from one Android device and then importing this file to another device. Android OS has a phone book archiving feature called import/export. Thanks to this, a complete backup copy of the directory is created for storage in a safe place or restoration in other devices. Importing or exporting occurs in three stages: archiving, copying, and restoring.
To create a phone book archive, you need to export contacts:
- Open the standard “Directory” application, since third-party utilities often lack this function.
- Click on the button in the form of three dots in the upper right corner. Select “Import/Export” from the pop-up menu.
- In the window that appears, click on “Export to VCF file”.
- Then save the file; it is not necessary to change the name. To save the file, you need to call up the hidden panel on the left by clicking on the 3 stripes in the upper left corner.
- If the internal memory of the device is not displayed, you need to click on the button in the form of three dots - in the upper right corner. Select “Internal Memory” from the pop-up menu.
- Next, the file manager will open, where you need to select your preferred folder and click the “Save” button.
Important! On earlier versions of Android or on devices that do not have a file manager, the file with phonebook contacts is saved by default to the root section of the internal memory. The directory archive file stores only phone numbers and names, some additional information and ringtones, often not copied, and the quality of photographs is reduced to save space.

Restoring contacts from an archive is done by importing contacts in one of two ways:
- In the directory, select “Import/export” from the pop-up menu. Next, “Import from a VCF file.” Specify the location where you saved your contacts during the import stage - phone or Google account. In a new window, select the file, after which the contact transfer will begin.
- Open file manager. Find the location where the contacts file is stored. Click on the file and select a save location - phone or Google account.

Below we will consider the intermediate stage and methods of transferring a file with contacts to a mobile device.
Transfer contacts from Android to Android via computer
The method is useful in three cases: when one or two devices do not support memory cards; You need to save a backup copy on your computer at the same time; The display does not work, but the previously created phone book file is stored in memory.
To copy contacts from your phone to your computer, follow the instructions:
- Connect one or both devices to your PC via a USB cable.
- On the first device, find the phone book file and copy it to the PC. Afterwards, transfer it to the memory of the second device.
- If both devices are connected, it is not necessary to copy the file to the PC; it is enough to immediately transfer the phone book archive to the memory of the other device.
- Next, set up phone numbers.
Main advantages:
- Simplicity and accessibility.
- Quickly transfer contacts to one or more devices.
- No internet or Google services required.
Main disadvantages:
- You cannot move music and photos installed on a contact.
- There is no ability to selectively move phone numbers.
How to copy contacts from Android to computer using FTP connection
This method is based on interaction with a PC, but the W-Fi router acts as an intermediary. Algorithm of actions:
- Download and install an application that can automatically create an FTP connection, for example Moto File Manager.
- Open the program, select “Remote control” in the hidden panel on the left.
- Connect the device to your home Wi-Fi network and click the “Connect” button.
- The application will activate the function of sending files via the FTP protocol and will provide the address required to be entered in the address bar of the explorer on the computer.
- After pairing, find the folder with the saved file, and then transfer it to a PC or other device connected via a USB cable or FTP.


Main advantages:
- There is no need to connect the device to the computer via a cable and/or install drivers.
Main disadvantages:
- You need a Wi-Fi router, an application to create an FTP or the Internet to download the program.
In the absence of the Internet or a PC, a Bluetooth wireless module is suitable for transferring a phone book file.
Instructions:
- Activate Bluetooth on the sending and receiving device. To do this, in the settings section, Bluetooth item, set the regulator to the “on” state. Activate the detection function on the receiving device.
- On the sending smartphone or tablet, using the file manager, select the file and click on the “share” button.
- In a new window, select using “Bluetooth”. Then accept and save the file on another device.

Main advantages:
- There is no need for the Internet, computer or Google services.
- Selectively send multiple phone numbers.
Main disadvantages:
- Availability of Bluetooth module on both devices.
How to transfer contacts from phone to phone using Gmail
This method is similar to the previous method, only Gmail email is used instead of Bluetooth.
Instructions:
- Activate the Internet on your mobile device.
- Using the file manager, mark the file with contacts and click on the “share” button. In the new window, select “Gmail”.
- An application will launch where you need to specify an email address to send the file and click on the send button. If there is no Internet, sending will occur the first time you connect to the network.
- On another device, you need to go to Gmail and download the attached file.

Main advantages:
- Simplicity and accessibility.
- There is no need to pair two devices, use a PC or additional equipment.
Main disadvantages:
- Internet access required.
- Google services are required.
The algorithm for copying the phone book corresponds to the previous method. The main difference is the use of flash memory instead of a SIM card. This method compensates for some of the shortcomings of the SIM card, and is also suitable for transferring contacts to a tablet or other Android device.
The procedure for transferring contacts from Android to Android phone via flash:
- Open the application with phone numbers and click on the “Import/export” item.
- In the window that appears, select “Export to storage” or “Export to MicroSD”. The item name may differ due to translation.
- Confirm the export of contacts, where the device will inform you of the saving path. This is usually the root folder of the internal SD drive.
- Open the file manager, find the telephone database file with the “vcf” extension and send it in any convenient way to another device.
- Save the received file on the smartphone or tablet to which you want to transfer phone numbers.
- Open the telephone database file in the file manager. In the window that appears, select “Contacts” to save phone numbers automatically.
If the new device does not have a file manager or nothing happens when you click on the phone base, then you need to do the following: open the directory application, then select “Import/export”, in the window that appears, select “Import from media”.

In addition, the database can be downloaded to a memory card, stored in your phone memory or in cloud storage. Thanks to this, you can always restore contacts in the event of an unplanned move to a new smartphone.
Main advantages:
- To transfer phone numbers, Google services, a computer and the Internet are not required.
- When exporting, additional information, contact photo, etc. are saved.
- There is no limit on the number of numbers in the telephone database.
Main disadvantages:
- There is no option to selectively save phone numbers.
How to transfer numbers from one phone to another via SIM card
If phone numbers are stored on the SIM card, then the database can be easily transferred to a new device. The method is relevant if you need to copy the phone book, but there is no access to the Internet, Google services are missing or not working. However, you will not be able to copy the phone book to a device without a SIM, such as a tablet.
Transferring contacts from an Android phone to an Android phone is done in two steps. The first requires saving contacts to the SIM card, and the second requires restoring. If the numbers are stored on a plastic card, then skip the first step and move on to the second.
Stage 1: transfer contacts from phone to SIM card.
- Open the “directory” on your mobile device and select “Import/export”. As a rule, the item appears in the drop-down list after clicking the ellipses button.
- In the window that appears, select export to a SIM card and wait for the operation to complete.
Stage 2: transfer data from SIM card to smartphone or tablet.
- Install the card into a new smartphone or tablet.
- Open the “directory” and select “Import/export”.
- In the window that appears, select import from a SIM card and wait for the operation to complete.
Note! The SIM card memory can hold up to 250 numbers. If there are more contacts, some of the records will not be saved.
Main advantages:
- No internet, computer or Google services required.
Main disadvantages:
- Limit SIM card memory to 250 numbers.
- There is no option to selectively transfer contacts.
- When copying numbers, additional information and photographs are not saved.
Copying contacts from Android manually
This method is suitable for users who use an Android smartphone for work purposes and need to transfer only some phone numbers. This is also a convenient way to share a contact from the directory with friends or loved ones.
To manually copy contacts from Android you need:
- Go to the directory and select the required phone number.
- Click on the button in the form of three dots to call up additional actions. In the list that appears, select “send”. Select contact numbers if there are several phone numbers and click “ok” or “next”.
- In the list that appears, select the appropriate transfer method: Bluetooth, Email, Gmail, text message, Google or Yandex drive.
After confirming the action, the allocated phone numbers will be sent via the selected method. All you have to do on another device is save the contact.
Main advantages:
- Easily send phone numbers to your smartphone or tablet.
- There is no need to synchronize your account, save a database, Google services or use a computer.
- Selective contact transfer.
Main disadvantages:
- Send only one contact at a time.
Video on how to transfer contacts from android to android
Conclusion
Use Google synchronization to easily and quickly copy numbers and other data. If you don’t have a Google account, then it’s best to transfer contacts from phone to phone using “Import/Export”. And manual copying is suitable for selectively sending some numbers.
In addition, the Google Play application store contains programs for transferring phone book numbers from Android to Android. As a rule, such utilities work on the “Import/Export” principle, which is described in detail above. However, some functions are not available, so you need to purchase the full version of the application.
In case you need to transfer phone numbers from a damaged Android device, read the article: “”. ( 8 ratings, average: 4,50 out of 5)
Purchasing a cutting-edge smartphone is always a joyful event, but some troubles are also inevitable. In addition to actively mastering the unusual interface and capabilities of the device, you also need to worry about how to transfer contacts from Android to Android. There are many ways to do this, and our article will look at the simplest and most popular of them.
One of the simplest and most accessible ways to transfer data is to copy it to a SIM card. To do this, you need to find the “Import/export” option in the phone book settings and select the location to save the Sim card. It should be noted that copying contacts from a SIM card to Android will not always be convenient, because the card’s capacity is limited to a small number of numbers. On average, this is 100 – 150 numbers, so this method will not work for owners of an impressive list. It is also worth noting that the names saved on the SIM card can be arbitrarily shortened to 5 - 8 characters, so long names can be confused. Such inconveniences are completely solvable, but to facilitate further work on identifying unknown numbers, there are also other simple methods.
An “improved” version of the previous data transfer method is saving phone numbers to a memory card. Usually, even older phone models received this accessory at one time, so it is quite logical that it will become the property of another gadget. To successfully transfer photos, videos and text files, as well as a list of your subscribers, to a new device, just follow the following procedure.
How to transfer:
- In the “Contacts” section, select “Settings”.
- Select the export option.
- Select “CD card” as the save location.
- After these manipulations, insert the card into the new device.
- In the map settings section, select files with the .vcf extension.
- You need to open the file and transport it to the phone book.
The algorithm is almost exactly like transferring phone numbers via a SIM card. At the same time, it is worth considering that if you transfer a large volume of media files at the same time, the memory card capacity may not be enough
How to transfer contacts from Android to Android: if the screen does not work
How to transfer contacts from Android to Android if the screen on your old mobile phone does not work? This question is of interest, first of all, to owners of broken gadgets, when buying a new one has become not just a whim, but a necessity. Whether to restore an old device or buy a new one is a controversial issue. At the moment, it is much more important to preserve your data remaining in the memory of the “victim”. The service center is unlikely to agree to share information, and you will have to check the correctness of the data yourself.
To transfer data from a non-working phone you need to:
- Download and install special applications on your desktop computer that provide communication with a third-party gadget.
- Connect the damaged device via USB port to the computer.
- Open the installed program and, following the system prompts, find the files to transfer.
- Save the necessary information on your computer.
- Connect the new device to your computer and transfer saved numbers and other information to it.
An interesting way to transfer the necessary files is to use a computer headset (mouse). To do this, the old mobile phone must support the OTG option. You can find out more information in the accompanying documentation for the device. The mouse is connected via a standard USB adapter, after which the required volume is transferred to the computer. If you have previously connected your smartphone to a minikeyboard or touchpad, the synchronization of devices should be saved in the settings, so you can use this option.
No less interesting, although more problematic, will be the transfer of information when displaying the Android screen on the display of your computer. To do this, use a special ADB Run application, which must be installed on your PC. After this, a connection is made via the USB port and debugging is carried out. The result of such actions will be the display of the screen of your device on the computer. After successfully completing the procedure, you can continue all the necessary manipulations with the information available on the smartphone. It is usually recommended to save it in the computer’s memory and delete it from the mobile phone before taking it for repair.
Interesting: you can restore the necessary information even from a completely broken (sunk) gadget. This is possible if the internal circuit has survived, but you will have to contact the service center specialists. Depending on the situation, the microcircuit is resoldered or a “donor” mobile phone is used.

Transfer contacts using PC
Microsoft's standard capabilities allow you to connect to almost any smartphone or tablet. This is done using a USB connection or via Bluetooth. Using a computer, you can sort the data, edit it if necessary, and scan it for viruses. To work with images and video files, pre-installation of third-party programs may be useful, but even without them, the possibilities for processing files are very diverse. For this purpose, there are special categories of software designed not only to work with certain manufacturers, but even models.
The applications used are selected based on the model and manufacturer of the gadget. For Samsung users, it is recommended to choose the Kies program. For HTC smartphones, the HTC Sync application is more suitable. For Sony - PC Comanion. Huawei phones work with the HiSuite program. For Nokia models this is Nokia Suite, the manufacturer LG has a program called LG PC Suite and so on. To clarify such information, you can send a request directly to the service center of your representative office, or look for the relevant section on the official website.
Transfer contacts using a Google account
After activating a new smartphone based on Android OS, the user is authorized in the Google browser. To do this, you need to create an account in the system, after which many additional opportunities open up. You should definitely use this service (free and simple thanks to constant system prompts), because it will help solve a number of problems and provide additional phone options.
What does registering a user in Google give:
- Link your email and view messages at any time, regardless of where you are.
- Download programs, games and other software from the Google Play application. Many of the apps here are completely free, so the simple registration process will pay off handsomely.
- The ability to track a lost or stolen smartphone with a connected geolocation function.
- Synchronize all devices in one account, which will greatly simplify the search and allow you to use bookmarks on different gadgets.
- Activating your account allows you to access your saved passwords without having to enter them again.
The function we are interested in is trouble-free data transfer, which is carried out in several stages. First of all, you should take care of registering an account and synchronizing your device with Google storage. After this, just activate your profile on the new phone and go to the “Accounts” section. Here you need to find the “Contacts” category and check the box next to it. After this, an open profile from any device will show the numbers saved in your phone. The option is also convenient because you can edit records, as well as view subscribers who have been deleted within the last 30 days. If necessary, you can quickly restore an accidentally deleted number.
Transferring contacts using Yandex Disk
You can also transfer contacts from Android to Android using third-party applications, the most popular of which is this program. Its operating principle will be similar to transferring information using a Google account.
Algorithm of actions:
- Download the Yandex Disk application from the Play Market.
- Register in the system, create your account.
- Transfer all necessary data from your old phone to temporary Yandex storage.
- Connect a new device to the system and log into your profile.
- Transfer all data to your phone. Some versions of the applications have a special “Move from Phone to Phone” feature that makes this process easier.
By the way, you can also move phone numbers using the Viber application. If it was already installed on your mobile phone, just download the program to your computer and log in to it using your number and data.

Transfer contacts without a PC
It will be much easier and faster to transfer via a desktop computer, but access to it is not always available. That is why you can take advantage of other opportunities. The Gmail service, which provides postal services, can help with this. All numbers and other information of interest can be sent to your email, after which you can safely pick it up from your new gadget.
A Google account can act as a temporary storage (when an Internet connection is possible). If wireless communication is not possible, you can transfer numbers to another smartphone using a SIM card or memory card.
Via bluetooth
Using a Bluetooth wireless connection also has its advantages. Most phone models, even the most outdated ones, support this method of transmitting information, so transferring subscriber numbers can be done using this method.
How the transfer is carried out:
- Both devices need to find and establish a connection with each other.
- Select the necessary files and send from the old device to the new one.
Bluetooth - the connection is easier to establish between phones of the same manufacturer, for example Samsung. The method has a simple algorithm, but requires quite a lot of time. With a large amount of data, the transfer of information may take more than an hour, and it is not recommended to receive calls during this period, because the connection may fail and some of the information will be lost or not transmitted. These are, perhaps, the most serious “disadvantages” of this method, but in general this method of transmitting information is quite good and is suitable even for smartphones using different operating systems, for example, Android and iOS.
How to transfer numbers from a feature phone to Android
Copying contacts from Android to Android from a feature phone will be a little more difficult, but this task can be solved relatively quickly. Many of the methods described above are suitable for this, which you can choose yourself.
What methods “work” in such situations:
- Saving to a SIM card and then transferring it to a new smartphone. For the most “ancient” models of push-button phones, this is the most reliable and proven method. It’s more popular to write out all the phone numbers manually and transfer them to a new mobile phone in the same way. Such manipulations are forgivable either in absolute isolation from all modern achievements. Or if there are 2 – 10 contacts, when such a procedure will really become the optimal solution and without unnecessary problems.
- Transporting the old device to the memory card. After removing and activating the card in the new gadget, you need to remove the information from the storage and install it in the phone book. You can use a flash drive in a similar way by connecting it first to the computer and then to the purchased device.
- Import to Gmail email service. To do this, in the settings section, select the path “Contacts” - “More” - “Import”. The saving format may vary. To successfully connect and open files, it is advisable to select the .dat extension. After authorizing your Google account in the new device, phone numbers will automatically appear in the appropriate section.
- Connecting the device directly to the PC and transferring all files first to the computer’s memory, then to the new gadget. It is important to save the received files in the required format. The document name must end in .vcf.
- Data transfer via Bluetooth connection. You can transfer everything to a new mobile phone at once, or you can first save the files to your computer and then transfer them to your smartphone. If there is a large amount of information being transported, this method can take a long time.
What you should not do under any circumstances is to reflash the device or reset the update to factory settings. Such manipulations will lead to only one thing - complete and irreversible loss of all saved data. In this case, even a service center specialist will not be able to return the information.
The safety of personal information requires extreme caution, so if necessary, you need to know how to transfer contacts from Android to Android. The procedure has many variations, depending on whether the user has access to a desktop computer, a personal Google account, or an email account. You can send information in several ways even from an old push-button mobile phone, without the tedious process of copying phone numbers into a notepad. The main options for transferring personal information: phone numbers, photos and videos are discussed in our article.
Surely everyone, after purchasing a new smartphone, asked the question: “How can I transfer contacts from phone to phone?” Moreover, this can be done in the most painless way both for the gadget itself and for the nervous system of the owner.
Let's try to figure it out and list the most popular ways to transfer contacts from an old phone to a new one: using third-party software, a personal computer and other available equipment.
Transfer contacts using PC
Before transferring contacts from phone to phone, we need an old gadget from which we need to export, a personal computer and a USB cable (preferably a branded one). The MOBILedit utility will be used as software support, which can be downloaded from the official website of the developer.

The basic version of the software has not been translated into Russian, and if anyone has problems with this, you can look for amateur resources that take care of localization. In any case, all the functionality of the program is intuitive and should not confuse you.
Before transferring contacts from phone to phone, the utility will first offer to download or update drivers specifically for your gadget. In order to speed up the process, you can select your specific smartphone model and confirm the start of installation.
After completing the installation of drivers and other supporting software, you must go to the “Cable Connection” tab and, after asking for the connection type, select “PC Sync”. Sometimes a different name may appear - it all depends on the model of your gadget and the installed drivers.
- Smartphone settings.
- Developer options.
- Click on “USB Debugging”.
These steps must be completed with gadgets on the Android platform with a version lower than 4.2. In other cases, the instructions for the phone will be different:
- System tab.
- "Device Information".
- Item "Build number".
- "USB Debugging"
Then, already in the MOBILEDit program, select the “Phonebook” tab on the left side of the utility and go to export. Before transferring contacts from phone to phone, we indicate the type of file to be exported, as well as the location where it will be stored. Next, select “Import” in the menu and, following the program’s instructions, transfer the old contacts to the new gadget. This can be done either via a USB cable or via wireless protocols (Wi-Fi, Bluetooth).
Google Drive
If you had a simple phone without any specific “problems” and have access to the network, you can use software from a well-known search engine. You can synchronize the service from Google with your phone book.

This synergy is also practical because you can make any changes to your data at any time without having your phone at hand. Before transferring contacts from your old phone to a new gadget, you just need to log into your Google service account on the new device and agree to synchronization.
Among other things, the software provides its clients with opportunities that were lost for some reason in the last 30 days.
"Yandex.Disk"
Another simple way to transfer contacts from an old gadget to a simple phone is a domestic service from the search engine of the same name, Yandex.Disk. Just as in the previous case, we will need a network connection.

Before you start exporting, you need to install the appropriate software from Yandex, which can be found in the corresponding section of the Google Play service. Once you install the application, you will need to copy all the contacts you want to transfer.
Then, after your data has been copied and your Yandex.Disk account has been activated, you should complete the following steps:
- Launch the utility on the new phone and log in to your account with the same data with which you logged in earlier for export.
- Next in the menu you need to go to the “Settings” item (the name may change depending on the model).
- Select the “Move from phone to phone” tab.
- The utility will ask for the secret code that you received earlier - enter it and confirm the move.
- After the application finishes its work, it will notify you that the transfer operation is complete.
Transfer contacts without a PC
If you do not have the opportunity to connect to a personal computer, you can go another way: through the Bluetooth wireless protocol. To transfer contacts, follow these simple steps:
- Turn on your phones.
- Activate the Bluetooth function on both devices (the instructions for the phone will indicate how).
- On your old gadget, go to the Bluetooth settings menu and start searching for a new device.
- Confirm synergy with the new gadget by entering the same PIN codes.
- Go to the sections of your phone book and mark the contacts you want to export.
- After transferring the data, the contacts will appear on your new gadget.
Transfer data using SD and SIM cards
If your old device supports this function, you can copy contacts using a SIM or SD card. The process only seems complicated, but in reality everything is quite simple. The main thing is to follow the instructions.

Export via SD card:
- Insert your memory card into your old phone.
- Through the menu and working with contacts, save data to a CD card.
- Reinstall the card on a new gadget.
- Upload contacts via “Contacts” -> “Functions” -> “Export/Import contacts” -> “Copy from SD card”.
Export via SIM card
One of the oldest (but proven) methods for migrating contacts is export using a SIM card. It is used only in the most emergency cases (without light, Internet, removable media, etc.).
The main disadvantage of this method is the character limit in the name. That is, you will be able to transfer contacts (no more than 200), but all of them will be “cut off” to 8 characters, which is extremely inconvenient (you have to be clever with abbreviations of first and last names).
In order to copy contacts via a SIM card, you must first export it to it in the old phone through the menu, and then, after inserting it into the new gadget, transfer all the data to the phone book. Everything seems simple, but restrictions greatly distort all migrating information.
Hello dear readers. How to transfer contacts from an old phone to a new one? How can I save my contacts from my phone so that I can later transfer them to a new one?
Similar questions come to mind for many phone users. Today I will try to give you a comprehensive answer to them.
The article contains many illustrations, so I warn those who do not have unlimited traffic
In the modern world, the mobile phone has greatly accelerated and simplified the lives of not only business people, but also ordinary residents of the earth. The telephone numbers of our loved ones, relatives, friends and business partners are stored in the contact directory. Sometimes, the loss of the mobile phone itself is not as expensive as irrevocable Losing a list of contacts with phone numbers in his directory.
Contacts can be lost, for example, when resetting the phone to factory settings, when flashing the phone, when the phone itself is lost, in case of a failure, children can accidentally delete it, etc. Therefore, sooner or later everyone begins to think about how to secure contacts on your phone from these misfortunes.
There are several ways transfer phone contacts for their preservation and subsequent restoration at the right time. But, after saving contacts, we also need to restore them at the right time. This is due to the fact that there are several different operating systems ( Android, WindowsPhone, iOS) poses a bit of a problem. The problem can be easily solved. We will save contacts in a format that is supported by all of the listed mobile operating systems, namely in the .vcf format - vCard.
Transfer contacts (export) from your phone in vCard format
vCard- This is a special format for exchanging business cards. Has the extension .vcf. This format is supported by major mobile operating systems. This Android, iOS, WindowsPhone, as well as other modern mobile phones on other platforms. This format allows you to transfer contacts without losing information . If we export contacts to a SIM card, and then import them to a mobile phone in a new phone, then often the full name of the contact is shortened to a certain number of characters. In addition, information about e-mail is lost, addresses are lost, etc.
Export (transfer) contacts from android.
To export contacts in .vcf format from the Android platform, go to the application " Contacts".  Next, go to the context menu. This is done differently in different devices. But as a rule, the transition to the context menu is carried out by clicking on a button in the form of three dots or three stripes.
  In the context menu (again, it is different for different devices - options, additionally) follow the link "".
  The following window will open, where we select the location where you want to transfer the contacts, and in some devices you will be offered a choice of formats in which the contacts will be exported.
  After export you will receive a file with the extension .vcf
Export (transfer) contacts from Google.
IN Android if synchronization of contacts with profile is enabled Google, then they are stored on their servers in the user profile. To manage your contacts on Google go to service" Google Contacts" at contacts.google.com
Here on the left there will be a menu in which we press the button " More". The menu will open and then press the button " Export".
 If you are in the new service interface, you will be prompted to switch to the old version (at least at the time of writing this was the case).
  You can also immediately go to the old version by clicking the link " Return to old version".
In the old version, check the boxes in front of those contacts that we want to transfer to another medium and then press the button " More" --> "Export". You can also select all contacts at once by checking the box in the top line. All this can be seen in the screenshot below. 
Next, a window will open in which we just need to select the format of the exported contacts and click the button " Export".  Contacts will be downloaded by the browser in the format vCard to your computer.
Export (transfer) contacts from WindowsPhone.
U WindowsPhone contacts are synced to their cloud service live.com. To use this service you must have a registered profile on microsoft.com. To transfer contacts, we need to go to their service in our profile profile.live.com and by clicking on the menu button (see the picture below) select the service " People". 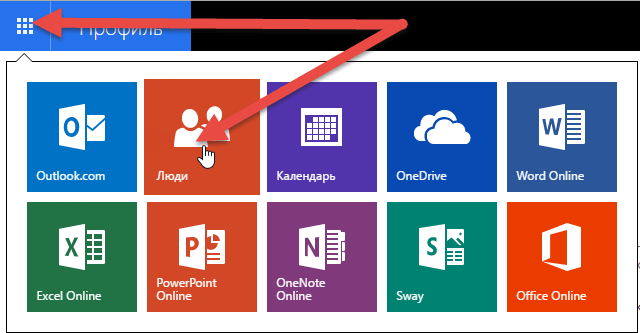
Next, click on the menu button " Control" --> "Export contacts". A window will open on the right where we select " All contacts" and format (unfortunately, there is only one option for the export format - "Microsoft Outlook CSV") and click on the button at the top " Export".

As for the upload format, contacts exported in this way can be imported into Google contacts and download from there in the format vCard, so that there are no problems with their further restoration directly on the phone.
Export (transfer) contacts from iOS.
For iPhone To transfer contacts from your phone, you first need to enable synchronization of contacts with the service iCloud. After synchronization, go to the page www.icloud.com and select the section " Contacts".  A page with a list of contacts will open. To upload contacts, click on the gear icon in the lower left corner.
  From the menu that opens, select " Export vCard". Next, click save and all contacts from iCloud in one file of .vcf format.
Restoring (importing) contacts on your phone
Above in the article, we learned how to transfer contacts from your phone to another medium to save them. Now we need to find out how to restore them if necessary. Restoring contacts I will also show using the example of the above listed OS and services. In principle, a more or less prepared user will be able to do this without any hints, but we may have completely unprepared people on our site, so let’s start.
Import (restore) contacts to android from vCard.
To restore contacts to Android we need to import them from vcard file with the extension .vcf To do this, go to " Contacts", click the context menu button and select the item " from the drop-down list Importing contacts". Next, select the location where you store your backup contacts. In my case it is an SD card.
  The system itself will find the file, if there is one (usually it is stored in the path SD card\System\PIM).
  Select it and click OK. (in the example Android version 5.1.1 on a Sony phone).
Import (restore) contacts to Android from Google.
There is nothing complicated here. You can simply enable synchronization with services Google and enable contact synchronization. To do this, go to " Settings" --> "Accounts"and there we choose Google(it is assumed that you have an account and have already added it to your accounts).  Click on your account and select what should be synchronized on the phone.
  In our case it is " Contacts".
 We activate them, click the context menu button in the upper right corner and select the item " Sync now".
Import (restore) contacts into iOS.
On iOS Device contacts can be imported in several ways. Let's list them, and let's dwell on one of the easiest ones in more detail:
- Import via iTunes
- Import via iCloud
- Import via CopyTrans Contacts(service for exporting/importing contacts to an iOS device)
- Import using apps from AppStore(ExcelContacts, Contacts Backup - IS Contacts Kit, etc.)
- Import from file vcard- .vcf
The easiest way is to email yourself the file vcard with contacts and open it in mail at iOS device. And be it iPhone or iPad They will offer you to add contacts to the directory.
P.S. About WindowsPhone restoration, I hope dear readers will add in the comments. There, to import contacts from other services, they need to be in .csv format, i.e. tables excel. Otherwise they will not be imported correctly. And there is no point in describing this whole matter. The article turned out to be very long. Perhaps I will write about importing contacts into WindowsPhone in a separate article.
Many of us have faced the problem transfer contacts from phone to phone when purchasing a new device with a different operating system. If it is necessary to transfer their contacts to a new smartphone, inexperienced users often complicate this process by entering data manually and forgetting about the possibility of automating the transfer process and various synchronization methods. But there is no general algorithm, because there are several operating systems and contacts are transferred using different methods depending on where they need to be copied from. If we are dealing with a new Android phone, then in almost all cases the common feature is the participation of a Google account as an intermediary. To enable synchronization of your smartphone with your Google account, you need to follow the path “Settings” - section “Accounts” (Accounts) - item “Google” - select your account - and check the box “Synchronize Contacts”. This procedure is often repeated, so at the end of the article I wrote about it in a little more detail.
Transfer from SIM card

This option assumes that your contacts are stored on the SIM card, partially or completely. Be careful, some contacts may be stored in the internal memory of your phone/smartphone.
Procedure for transferring contacts from a SIM card:
- Open the Contacts app on your Android smartphone.
- Press the “Menu” button and select “Import/Export”, which will open access to the list of contacts on the SIM card
- Press “Menu” again, then select “Import All”
- If you have duplicates in your list or you just want to selectively transfer contacts, you can select individual entries from the list to copy.
Transferring contacts from iOS devices (iPhone, iPad, iPod) to Android

- Open iTunes, select the Apple device from which you will transfer data.
- Go to the last tab “Information”
- Check the box next to “Sync contacts with: Google Contacts”
- Click the “Settings” button and enter your Google account information.
- Save the settings, click the “Apply” button.
Transfer contacts from Windows Mobile on Android
- Open the ActiveSync app on your old device.
- From the menu, select Exchange Server settings.
- You must specify m.google.com as the server address, and SSL must be enabled.
- Login and password are details from your Google account.
- At the final stage, you can select the information to synchronize (Contacts, Calendar, E-mail and Tasks) and after completing the settings, press the “Synchronize” soft key.
- Sync your Android device with your Google account.
Transfer contacts from Windows Phone on Android

- Log in to the mail.live.com service using your Microsoft account and go to the “Contacts (People)” section.
- Click the Manage - Export button.
- All Microsoft account contacts will be downloaded as an attachment.
- Go to the “Contacts” section, click on the “Import contacts” link and upload the downloaded file.
- Sync your Android device with your Google account.
Transferring contacts from Symbian on Android

- Download Nokia PC Suite to your PC and connect your phone/smartphone to it.
- Open contacts in the application on your PC, select all the files and click “File” - “Export”.
- Export contacts to CSV format and save the file to your PC.
- Sign in to Google Mail using your account at mail.google.com.
- Go to the Contacts section, click on the “Import contacts” link and upload the downloaded file.
- Sync your Android device with your Google account.
Android - accounts and synchronization

Synchronization, which I wrote about at the end of each contact transfer method, is one of the most important features and most useful features of Android devices. It allows you to interact with various social network accounts and network services. The ability to add a new account depends on the relevant applications installed. For example, when installing Facebook, Evernote or Skype, you can set up synchronization with these services and add new accounts for them.

By default, it is only possible to add Google accounts, with which you can synchronize contacts, mail, calendar, tasks, applications, and even backup settings. By clicking on the selected entry, you can configure the synchronization frequency and the data that will be copied.
It might be useful to read:
- Cleaning up application files;
- In-depth review of Photos for Mac - everything you need to know about the iPhoto and Aperture replacement;
- CD changer emulator - can you make it yourself?;
- How can I change my last name in a contact?;
- Disabling the “Easy Payment” service from MTS;
- Creating polls in Telegram How to like in Telegram;
- Lead camera engineer for Sony Xperia on the development of mobile photography, Sony technologies and the future;
- How to transfer mobile game saves to another device?;