Installing Windows XP. Methods for traditional and automatic installation of Windows XP from a disk Installing Windows XP
Windows XP remains one of the most popular operating systems today. Users value it for its reliability and ability to work on weak old hardware. Step-by-step installation of Windows XP is a fairly quick and easy process. Below is a detailed description of it.
Preparing the computer for installing a new OS
The simplest way to install Windows XP is from an installation disk. If, instead of reading data from it, the system starts loading the old OS or a black screen appears that does not respond to button presses, then you just need to go into the BIOS and make the appropriate settings:
- Open the Advansed BIOS Features or BIOS/Boot Device Priority section;
- Select First Boot Devise;
- In the list that opens, select CDROM or the name of your drive;
- Save the result by pressing the F10 key and restart your PC.
 Note that there are a lot of BIOS versions for laptops today, so the described steps when installing the OS on a laptop may be slightly different.
Let's proceed directly to the installation
 The first window is a blue screen. It is at this stage that a step-by-step installation of software is carried out to install Windows XP on a SCSI (high-speed disk) or on a RAID array. To do this, press F6, after which the installation of the appropriate drivers will begin. But in most cases, users install the system on a regular hard drive, which does not require any intervention during the installation at this stage, you just need to wait for the next welcome screen.
- Install Windows XP. The standard choice in most cases is to install the system from scratch or restore the old one. A convenient graphical interface is used.
- System recovery using the console. This is the choice of professional users and craftsmen - recovery is performed from the command line using DOS commands. In this case, a complete reinstallation of the system is not performed.
 Next, the system proceeds to search for previously installed OS versions. If any were found, the list will be displayed on this screen below, and the menu will offer options for subsequent actions:
- restore old Windows XP;
- install a new copy of the OS.
 In the first case, you will be able to use previously installed applications. Only system files will be replaced, but the installation will be completed completely. The second option involves a complete reshuffle of the system.
No list will appear not only if Windows XP is installed on an “empty” computer, but also if the previously installed system has a different edition or service pack.
The most crucial moment of installation
The next installation point is perhaps the most important, and should be performed thoughtfully and carefully. You will need to identify the system partition and allocate disk space so that the virtual disk allocated for the system has enough space for its functioning.
Of course, you can use the same partition equal to the entire hard drive space for both the system and your personal data, but such an organization is guaranteed to create many problems in the future.
We split the disk into partitions
If you install Windows XP on a completely new disk, then you will have to distribute the partitions yourself, since this step-by-step procedure has never been performed before. The window that appears will indicate the size of the unallocated area - it will coincide with the size of the entire hard drive. 
Here you need to create a so-called The system partition is the one where the OS will be installed. To do this, you need to indicate its size in megabytes (1 GB is equal to 1024 MB) and press “Enter” on the keyboard. After this, you will again return to the window in which the hard drive is partitioned. The created section will already be displayed on a separate line with a Latin letter assigned to it (usually C). 
You should not skimp on the size of the system partition - the stability of the system will depend on it. The minimum space for installing Windows XP is 20 GB, but it is better to allocate not 20, but 40, or even all 60 GB.
Similarly, from the remaining unallocated area, we create other sections for personal data, however, you should not get carried away with the quantity - in this case, large files and folders will be distributed less efficiently, and navigation through the sections will become more confusing.
Format the system partition
Next, you will need to select the partition to install the system (in our case, drive C) and press the “Enter” key. A window will open asking you to format the partition.  Choose quick formatting using the NFTS system (FAT is obsolete). After formatting is completed, the process of installing system files will begin.
  The most difficult stage of installation has been completed.
By the way, if the disk that you partitioned is not formatted, then you can carry out this procedure with each of the created partitions for personal data even after completing the installation of Windows XP using standard means.
If you are rearranging the system and the disk is already partitioned, then you should simply select the partition with the system to be reinstalled, format it and start the installation process. If you decide to format the remaining partitions, then all information on them will be lost.
Finishing the installation
Once the system files have been copied, the computer will restart and the installation will continue.
We determine the initial parameters:

Probably every second computer-related website has an article about how to install Windows XP operating system. I thought that let my blog be no exception and remain on it Windows XP installation instructions.
You can install Windows on a blank hard drive; on top of an already installed system; or as a second (third, etc.) operating system. Each of these options has its own characteristics. Today I want to tell you how to completely reinstall your existing operating system while formatting the system disk.
In general, you can start installing Windows XP in two ways: 1) by booting from the installation disk; 2) directly from the installed system. The first option is preferable, and we will consider it.
A small digression: I did not take the screenshots used in the article myself. I borrowed them from the site compbegin.ru. I hope the author won’t be offended by me for this :)
So, for installation we need boot disk with Windows XP operating system. Only such a disk contains a special hidden partition with important system files that will allow the computer to boot directly from this CD.
We turn on our computer and first of all go to the BIOS to configure booting from disk. To do this, immediately after turning on, press the key on the keyboard Delete or F2(other keys may also be used, so you need to carefully watch the prompts on the screen).
Once in Bios, you need to find the section with the word Boot, and then change the order of boot devices in it so that the CD-ROM is in first place. Depending on the BIOS version, the device from which the computer will boot is either selected from the list or moved to the top using the keys F5/F6, +/-
.
After the changes have been made, we exit the BIOS, saving the settings. Before leaving, you need to insert a disk with Windows XP into the drive so that the computer can boot from it.
If any Windows operating system was already installed on your computer, then after rebooting you will see “” on the screen (this means “Press any key to boot from CD”). Accordingly, you need to press any button on the keyboard. If you wait more than 10 seconds, the current operating system installed on the hard drive will begin loading (then you will have to restart the computer again).  The Windows XP installer shell will appear on the screen. The OS will check the hardware installed on the computer and begin downloading installation files.
  At the end of this process, a window will appear asking you to begin installing Windows. Click Enter on keyboard.
 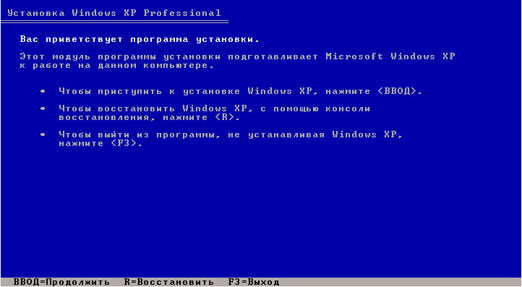 Next, accept the license agreement by clicking F8.
 It will then search for previous copies of Windows installed on your computer. If any are found, you will see a screen with a list of these systems.
  Here you will also be offered:
1) Restore the found copy of Windows by pressing the R key .
Recovery can help if Windows system files are damaged, deleted, or replaced by infected files.
If you select this option, you will have to go through the full system installation procedure, during which all system files of the old copy will be replaced with new ones from the CD. All your data, settings and installed programs will not disappear anywhere.
2) Install a new copy of Windows by pressing the Esc key .
Because we want to install a new Windows XP, then press now on the keyboard Esc.
You will not see a window with a list of installed systems if you are installing the system on a new hard drive, or if the previous copy of Windows has a different edition or service pack.
Because in my case, the operating system was already installed on the computer, and the hard drive was already distributed into logical drives. Therefore, a window appears listing all found partitions.  If the current partition of your hard drive does not suit you, you can delete existing partitions by pressing D(you can select the desired section using the arrows on the keyboard). After deleting a partition, the area it occupied becomes unallocated, and all data located on this logical disk is deleted.
The existing structure of the hard drive suits me, so I use the arrow on the keyboard to select the partition in which the system will be installed. Let it be C: Section2 (SYSTEM). Then I click Enter.
If the following window appears, just click Enter. Then select “Format partition using NTFS” and click Enter.
 The formatting process will begin:
  When it’s finished, Windows XP files will begin copying to your hard drive:
  After the copying is completed, the computer will reboot. If after rebooting a screen appears that says “”, do not press anything (just wait 10 seconds). Otherwise, the installation will start again.
Next, Windows will offer to configure the language and region. Click “Next”.  In the “Setting program affiliation” window, enter some name (for example: Ivan) and the name of the organization (for example: Nome). Click “Next”.
  The “Product Key” window will appear, in which you must enter the Windows XP serial number.
 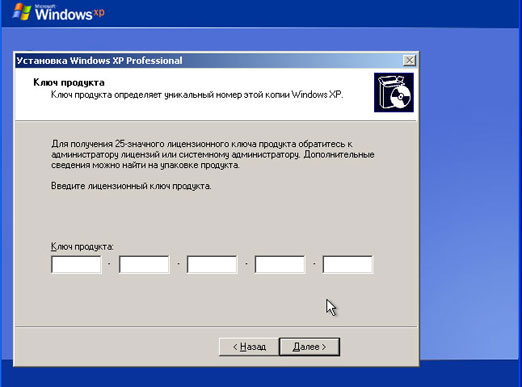 Next, come up with and enter a computer name under which it will be visible on the network (use Latin letters). The administrator password can be left blank.
  In the “Setting time and date” window, check all the settings and click “Next”.
  You will see the next two windows only if the Windows XP distribution contains a driver for your network card. In the first of them, we leave the marker in the “Normal settings” position, and in the second, we agree with the name of the working group WORKGROUP and simply click “Next”.
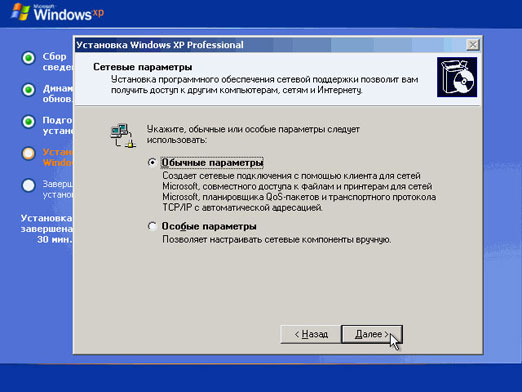
 Windows will then begin setting up the network and copying files. After the installation is complete, the computer will restart and offer to automatically adjust the screen resolution - click “OK”.
  A welcome screen will appear - click “Next”.
  The next window will ask you to enable automatic updates. You can select “Delay this action” and click “Next”.
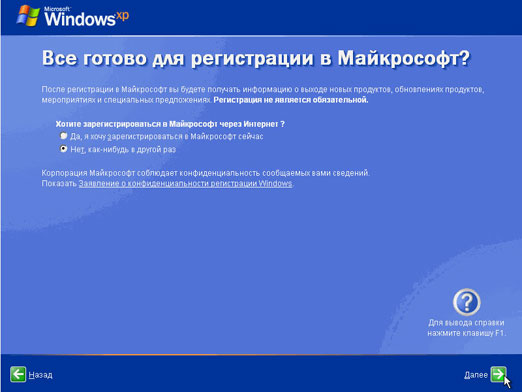
  If a network card driver was installed during installation, two more windows will appear in front of you. In the first “Test Internet connection” click “Skip”. And in the second, put the marker in the “No, some other time” position and click “Next”.
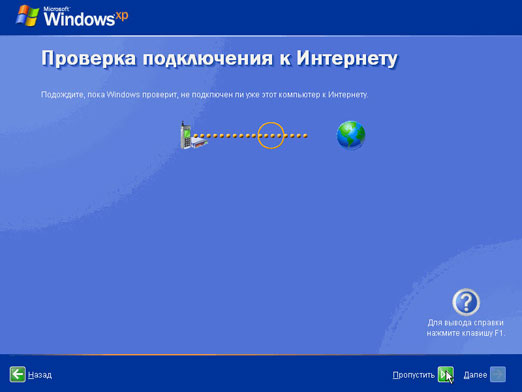
 The account creation window will appear. In the “Your account name” field, enter any name in Latin letters and without spaces. You can also create a second, third, etc. now. users, but for now one is enough. Click “Next”.
  This completes the installation of Windows XP. After clicking the “Finish” button, the Desktop will appear.
 Do not forget to return the computer to boot from the hard drive in BIOS.
How to make a reliable boot disk for Windows XP
Another very pressing question is how to properly make a boot or installation disk with Windows version XP, let's figure it out. Despite the fact that Windows XP is already obsolete, it is quite suitable for weak computers and laptops.
Windows XP is not much different in terms of functions needed by a home user from, for example, the new Windows 7, 8, 10 (). This suggests that Windows XP is a completely normal and modern operating system that supports almost all the same functions as, for example, Windows 7.
Introduction
It’s just that with the release of the new Windows 7, it is necessary to somehow “relocate” users from the already familiar Windows XP, and this is done by stopping its technical support.

And it so happens that over time, Windows XP on a computer or laptop begins to work slowly, generate errors, or simply some viruses have crippled its work. As a result, you have to reinstall it or install it on a weak computer or laptop.
This is not very difficult to do, but you need a Windows XP boot disk, from which it will be reinstalled; we will discuss this issue below.
And so first the list of what we need:
- An image of Windows XP (what is a Windows XP image - an image is a virtual copy of it, how to make a disk image), that is, at first Windows was on the disk, then they made a virtual copy from it to the computer, and they didn’t just copy it, but made an image, The image is created using special programs. And then from this virtual image you can even just burn it to disk, you can make a boot disk out of it, whereby the image is made of absolutely any disk, for example with a game, you need an image of a game disk, for example, in order not to insert the disk into the drive if the game requires it at startup.)
- blank cd or dvd
- a program for creating a boot disk (in this article we will use such an interesting and convenient program for working with disks as UltraISO)

And so we will continue how to properly make a high-quality boot disk with Windows XP.
Let's start with the Windows XP image, where can we get it?
You can ask your friends, or you can download it on the Internet. I won’t give download links, just type in any search engine “download windows XP image”, and I recommend downloading from the largest torrent tracker using the µTorrent program (read this article for how to download files from torrent trackers using it), There are guaranteed to be no viruses and the image will be fully functional.
Well, I think you also prepared a blank disk.
Now about the UltraISO program
Follow this link, you will see a list in front of you, find “Russian” and click on the green arrow on this line, a window will appear with the option to choose where on your computer to download this program, you can select to the desktop, although if it is Mozilla FireFox, then the file will be downloaded to the standard download folder on the C drive:

After you have downloaded the UltraISO program to your computer, you need to install it. Find the downloaded file and run it and click “Next”. In the window that appears, put “I accept the terms of the agreement” and click “Next”:

Now in this window the installation program offers to change the location where the program will be installed; you don’t have to change anything; the standard installation path suits us perfectly:


Create a boot disk
When you first launch the program, you will be asked to enter a key or buy it; we will take another option - this is a trial period. This period is enough for us to make a Windows XP boot disk:

Now, since everything is prepared, we proceed directly to creating a Windows XP boot disk. Open the UltraIso program, then the file, then open it. In the window that appears, find the Windows XP image to burn to disk:


In the window that appears, we make the following settings: in the drive field - you need to make sure that it is your DVD-RW, and not something else, well, in general, it is usually automatically installed, but we still check that it is DVD-RW... instead dots the name of your drive.
In the “Write speed” field we set the minimum speed, this is necessary for better recording of the image to disk and finally click “Record”:

In general, that’s it, after recording is complete, a high-quality installation disk with the Windows xp operating system will be ready, from which you can reinstall it, both on a slow computer and on a laptop.
Detailed description of reinstalling Windows Xp on a computer or laptop
Perhaps you were looking for:
How to install/reinstall Windows Xp without a disk (from a flash drive)
Step #1. Burning a disc
If you have a disk with Windows XP, then you can safely skip this step and go to [step No. 2] since here we will talk about what to do if you do not have a disk with Windows, but have a key (for example, you bought a laptop with on which the OS was installed, there is a piece of paper pasted on the back or side of it, on which is the key that we need, or another situation, but as a result you should have a key to Windows). We copy the key number onto a piece of paper so that it is at hand, and move on. Select one of the versions of Windows Xp. Both versions are time-tested
or 
Now search the Internet Windows Xp Sp2 Professional license disc. Since distribution is illegal, we have no right to provide a link to Windows. But I will give you a link to the ORIGINAL VERSION of Windows xp sp3 proffessional - By the way, if you want a pirated version, I will give you a link, but considering, again, that I do not have the right to post files on my resource, I will give you a link to a torrent with Windows Xp sp3 Simplix Edition
Original version of Windows Xp Sp3
Download Windows Xp Simplix Edition
After you have downloaded the Windows Xp image, download the program to burn our image to disk
To do this, download a program to burn our image to disk
Download Portable ImgBurn
After the Windows image and our ImgBurn program have loaded:

Step #2. The disk is ready. We set First boot device CD-Rom in BIOS
So, after Step #1 we have a disk with Windows Xp. At this stage our
the task is to get into the BIOS and set it to initially boot the disk with
installed Windows XP. To do this: Reboot or turn on
computer and press the delete key (there are other options, for example
F1,F2,F8,Ins. 
The initial splash screen should usually show you which key to press to enter the BIOS 
As a result, we should get to the BIOS blue screen, in our case it looks like this 
We set the first boot from the Disk to do this, go (with the usual arrows) to Advanced Bios Features -> First Boot Device, select CD-Rom, press enter, then esc, go to save&exit setup, press enter, then Y and enter again. 


Note: if you have a different BIOS, the essence does not change. The main thing is to find the First Boot Device and select CD-Rom. After step 2, the computer reboots itself and if you did everything correctly, then when you reboot, the message Boot from Cd/Dvd will appear on a black background: 
And after a while Press any key to boot from Cd.. 
(press any key on the keyboard to boot from the disk), press the key. If a blue screen appears with the Windows installation at the top, then at this stage you have done everything correctly. If the keyboard cannot be pressed, you need to go into the BIOS and set SUPPORT USB: YES 
Step #3 Formatting the partition. Installing XP or answering the question: " How to install Windows Xp for a teapot«
Now we wait (2-5 minutes) until a blue window appears with the inscription “Welcome to the installation program” 
Press Enter, then read the agreement and then press the key F8
A) If you already have a partition where we will install Windows Xp formatted and created (if not, read point b) -> select the partition 


If you see the message “The installation program is copying files,” everything is done correctly! Let's move on to point c 
B) If the disk is not formatted 
Select it and click on D
Attention: with this action we delete all data that is on the disk C:
Click L
Next, click “Unallocated area” WITH to create a new partition 
Enter the size of our partition in megabytes 
Select it from the list 
Format in NTFS system (fast)
If the message “The installation program is copying files” appears, everything has been done correctly and you can now continue starting from point in
C) When the installation load reaches 100%, the computer will reboot itself. (When the reboot is in progress, we DO NOT PRESS ANYTHING, we just wait) 
At the 33rd minute, fill in the language parameters 
Enter Name and Organization 
Product Key 
After you have entered the key, the installation will continue and Windows will be installed for at least 10-15 minutes and we will not take part in this. When Windows is installed, the computer will reboot again and we will only have to fill in the account name, which Internet you are using, etc. 

Congratulations, Windows XP has been successfully installed!
The need to reinstall Windows may be required for a number of reasons: data corruption of the previous OS, the need to clean the computer, installing an update, solving various problems, and so on. Let us consider in detail the nuances of this procedure.
Preparatory stage
Reinstalling Windows XP involves completely deleting data from the system disk. Therefore, you must first save all valuable documents. You can archive them and transfer them to removable media or upload them to cloud storage. All programs, saved passwords, personalization settings, license information and any other information will be erased. It will be impossible to restore them in the future, so the files must be saved.
You also need to prepare drivers for the network adapter in advance if it is not built into the motherboard. Typically, installation discs are included with devices of this type. But you can download the corresponding files from the Internet. Otherwise, it is possible that the PC will not have access to the Internet.
Creating a boot disk
To create a boot disk, first of all, you need to find a working build of Windows XP and download it to your computer. Further actions will vary depending on what media you plan to record it on.
Option 1: USB flash drive
There are a large number of programs that can write an OS image to removable media. In this case it will be considered WinSetupFromUSB.
Option 2: Optical disc
Ultra ISO- a popular program for working with disks. With its help, you can easily write a system image onto a blank. To do this, follow these instructions:

PC setup
When the preparatory steps are completed, you can proceed directly to the preliminary setup of the computer. To begin, insert the OS disc into the optical drive or connect a flash drive. Now you need to activate the PC boot not from the hard drive, but from a removable device.
To do this, open BIOS. This is done when the computer is restarted. Once the image appears on the screen, press the button repeatedly Delete on keyboard. If this does not work, then look at the inscription when you turn on the PC, there should be tips on how to enter this mode.
In the BIOS, open the Boot tab and go to Boot Device Priority. In the menu that opens, you need to put a USB flash drive or disk in the first place. 
Then return to the home screen and exit with Save Changes. 
The computer will restart. After some time, the main part of the procedure will begin.
Note: Most versions BIOS There is no possibility of mouse input. Use arrows and other keyboard keys. But it may not work if connected via USB. In this case, you need to connect a device with a PS/2 connector.
Reinstallation procedure
When the inscriptions appear on a black background, select the installation item (keyboard arrows) and press Enter. Now all you have to do is follow the prompts on the screen. The process may seem complicated, but in reality everything is very clear.
To begin, accept the terms of the license agreement (button F8 on keyboard). In our case, the PC already has the Windows XP operating system; the computer will offer to restore it. You need to opt out by clicking Esc.
Now comes the selection of the system disk for installation.  Assign the one on which Windows was previously installed. Messages will appear stating that it is not advisable to install two operating systems on one partition. Ignore this warning (button C).
And here you have a choice: the first option is to leave all data on the disk, including system files, the second option is to completely erase it. It is advisable to use the last option, in which case the procedure will definitely be successful.
It is preferable to choose a standard formatting method. It takes longer (approximately 10 minutes) but performs a complete HDD wipe, repairing bad sectors if possible. 
When the formatting procedure is completed, copying of system files will begin.  The computer will then restart. Wait for it to start, then the installation will continue.
  During the process, various windows with parameters will appear: setting the language, username, system revision, password, and so on.
Note: The password will be required each time the PC is restarted or the user is logged out. But you can leave the field with it empty, then the secret combination will not be specified. This will speed up the computer startup.
A simple way to reinstall Windows XP is described. Any user can handle it without any problems. Simply follow the instructions and recommendations from the article. At this point, the procedure can be considered complete; all that remains is the first launch and setup of the computer.
First start
The first launch of Windows XP will take longer than subsequent ones. During this time, the computer will configure various settings and also apply the settings. If a password has been set, it will be required to log in.
The first step is to set the screen resolution. To do this, right-click on an empty area on the desktop and select "Properties". This item is being changed in the section "Options". Then you need to update the drivers and configure the PC as you wish.
It might be useful to read:
- How to recover damaged files on a flash drive How to recover files after a worm;
- How to roll back a Windows XP system?;
- How to make a backup of a disk, files and folder;
- Windows Speech Recognition Guide;
- What does ranking mean? Ranging. Text design of pages;
- Corsair K68 RGB Gaming Keyboard with Customizable Backlighting;
- Full setup and installation of Realtek High Definition Audio;
- Restoring a VK page after deletion or hacking;