Installing Windows 7 on an HP laptop. Tips on how to reinstall Windows on an HP laptop yourself
Hello admin! How to install a second Windows 7 operating system on a GPT disk on a new HP ENVY laptop with pre-installed Windows 8.1 and UEFI BIOS?
I bought a new HP laptop, the hard drive has one drive (C:) with Windows 8.1 preinstalled from the store. I separated 100 GB from the C: drive, unallocated space appeared and now I want to install Windows 7 on it.
I connect the Windows 7 installation flash drive to the laptop, turn it on, enter the boot menu of the laptop, and my flash drive is simply not there. The same thing applies when using the installation disk.
Knowledgeable people advised to disable the Secure Boot option in the BIOS. Disabled it, then booted into the Windows 7 installer, selected a partition for installation, and an error appeared: The order of partitions on the disk selected for installation is different from the recommended one. For more information about installing on GPT disks, go to the Microsoft Web site (http://go.microsoft.com/fwlink/?LinkID=154898) and search for "GPT" . Continue installation? OK or Cancel.


Of course, our reader’s data will not be deleted and after clicking OK, Windows 7 will be installed by the second system on the specified partition of the hard drive, but in today’s article I want to offer you something else.
If you purchased a new laptop with pre-installed Windows 8.1 and UEFI BIOS, but want to install a second Windows 7 operating system on a pre-created partition, then this is quite feasible for some laptop models (unfortunately not for everyone), interestingly, you don’t even need to create a bootable UEFI USB flash drive for Win 7. In this article, I will show you the easiest way to install Windows 7 as a second system on your laptop.
- Note: Friends, this method has been tested and works on all simple computers and old laptops without UEFI BIOS. You can also use it on new ASUS, HP Pavilion and HP ENVY laptops with UEFI BIOS, but there is one thing! With new laptops it's not so simple. Due to the fact that computer hardware manufacturers can change the functionality of the UEFI BIOS on a laptop at any time, I advise you to make a backup copy of the BCD boot store before proceeding. If you cannot install Windows 7 as a second system on your laptop, then you can deploy a backup of the BCD boot storage and return the laptop to the state it was before our experiments. In my article I will tell you everything step by step, so don’t worry, you will succeed.
For this article, let’s take the same HP ENVY laptop. Before starting work, let's make some preparations. First, let's create a backup of the BCD boot storage, since after installing Windows 7, the boot menu of the laptop will be changed and a choice of operating systems will appear in it: Windows 7 or Windows 8.1, if after a while you want to get rid of Windows 7 and format the partition with its files , then the system selection menu will still remain when you boot the laptop; you can remove it by simply restoring the BCD from the backup.
Creating a BCD Backup
Create a folder on disk (C:) bacup,

Then open the command line as administrator and enter the command:
bcdedit /export C:\bacup\bcd

and a backup copy of the download storage, the bcd file, appears in the bacup folder. Do not delete the bacup folder on the drive (C:), at the end of the article I will show how to restore the bcd boot storage from a backup.
Disk management
We create a partition for installing Windows 7. We enter Disk Management and see three service partitions and a 680 GB drive (C:) with Windows 8.1 installed, right-click on it and select Shrink Volume...

50 GB will be enough for me, if you intend to work seriously in Windows 7, choose a larger volume.

From the unallocated area that appears, we create a simple volume (F:), onto which we will deploy Win 7.


Windows 7 ISO image
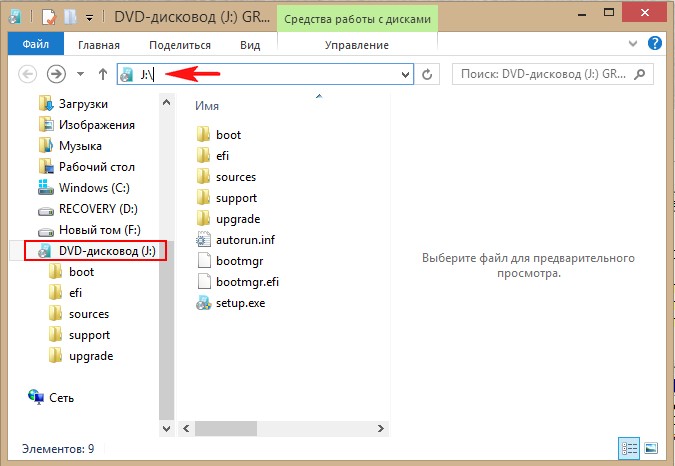
To install the system we need , you can according to our article. I will download it directly to the desktop and double-click on it with the left mouse and attach it to the virtual drive (J:).

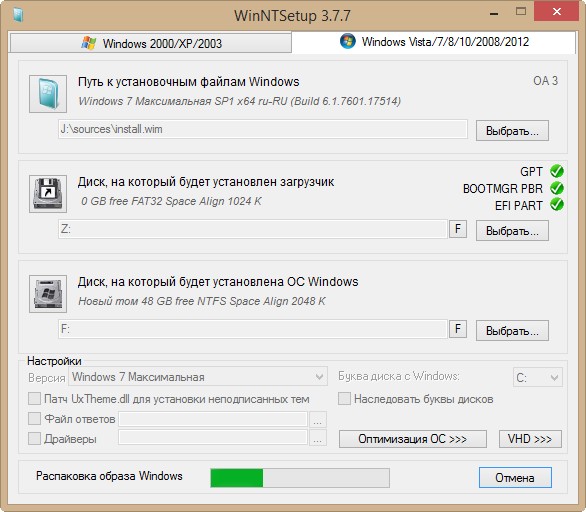
WinNTSetup
This program (familiar to you from) will help you deploy Windows 7 from an ISO image to the partition we created (F:) without a bootable USB flash drive or system installation disk.
Download WinNTSetup You can use it on my Yandex.Diskhttps://yadi.sk/d/xLGkpAOzhXCPcor on the official website
http://www.winntsetup.com/?page_id=5

Extract the utility from the archive and run the executable file WinNTSetup_x64.exe

Click on the Select button

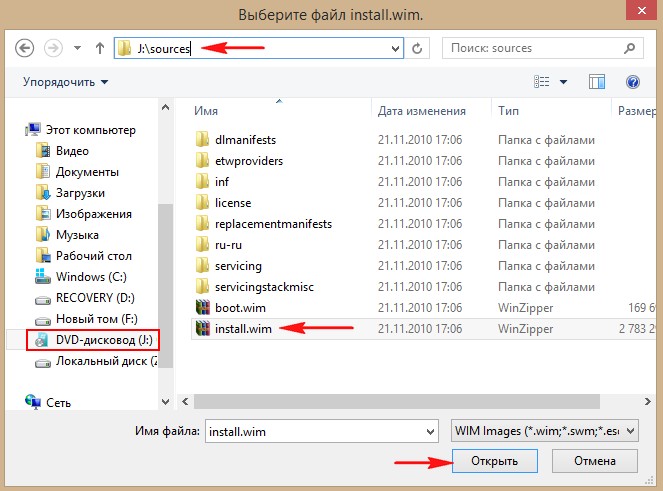
And we indicate the path to the Windows 7 installation files. We only need the install.wim file from the sources folder of the distribution. Go to the virtual disk (J: ) to the sources folder, select the install.wim file with the left mouse and click Open.
The path to the Windows 7 installation files is indicated.
The disk on which the Windows 7 bootloader will be installed is selected automatically - Z: (section Reserved by the system, volume 350 MB).
Select the disk on which Windows 7 will be installed. Click Select

Specify New Volume (F:) and click Select Folder.

Installation


The Windows 7 installation process begins

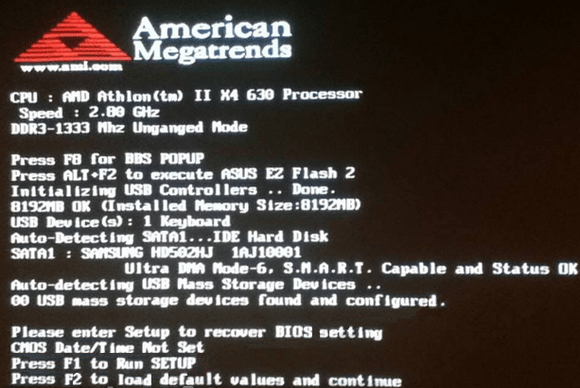
We reboot and enter the BIOS, set the Legacy support option to Enabled, and the Secure Boot option to Disabled (sometimes this is not enough), save the settings and reboot.

The operating system selection menu opens: Windows 7 or Windows 8.1, select the first

and immediately enter the final phase of installing Windows 7.

Enter the username and computer name


We accept the license terms

Your choice


Windows 7 is loading.
If you want to boot into Windows 8.1 and it doesn’t work, then enable the UEFI interface in the BIOS and be sure to boot into Win 8.1.

In Disk Management you can see that the system drive letter (C:).

The hard disk properties indicate the GUID (GPT) partition style.

Computer window

How to remove Windows 7 without a trace
We used the “seven” and decided to delete it. To do this, boot into Windows 8.1.

Open a command prompt as administrator and enter the command:
bcdedit /import C:\bacup\bcd ,

With this command we restore the Windows 8.1 boot storage to its original state, that is, when you turn on the laptop, the menu with a choice of operating systems will not appear.
Good afternoon, dear readers and guests of the blog, today we will tell you how to install the Windows 7 operating system on a new HP 15-ay043ur laptop, it seems that the procedure has long been known to everyone, but on modern laptops there are pitfalls that can be very difficult for a beginner to cope with. Below we will look at everything in detail.
Laptop hp 15 ay043ur
My friend bought a laptop hp 15 ay043ur, it has a 120 GB SSD drive, an average processor, 4 GB of RAM, the machine is normal for ordinary household things, the only thing I didn’t like is that it only has support for Wi-Fi IEEE 802.11n, Bluetooth 4.0, so that all sorts of Dir-320 will break off, distribute the Internet to you via a wafer.
This is what the HP 15 ay043ur laptop looks like

Installing Windows 7 on HP 15 ay043ur
In order to install the Windows 7 operating system, you first need to create the media from which you will boot, I previously told you how to make a usb flash drive bootable, so choose any of the methods and go ahead.
After which you need to boot from it, in most cases in computers or laptops, by default the boot comes from the local hard drive or SSD, in the hp 15 ay043ur laptop, the FreeDOS OS is generally installed, and therefore it will boot from you. In order to fix this, you need to select a priority flash drive, I also told you how to install booting from a flash drive in bios.
The process itself is trivial, but 90 percent of the time you will see this error:
No device drivers were found. Verify that the installation media contains the correct drivers and click OK.

The problem has been known for a long time, the distribution that you have with Windows 7 does not contain a driver for USB 3.0, so you won’t be able to install the drivers at the time of installation, you will have two options:
- Find a Windows 7 distribution with USB 3.0
- Integrate USB 3.0 drivers into the Windows 7 distribution yourself
As soon as you fulfill these requirements, you will already have a normal picture.

Next, partition the disk as you need and perform a clean installation of Windows 7. In general, I would advise, of course, to switch to the Windows 8.1 operating system; it’s too early for 10, there are a lot of glitches.
Download drivers for laptop HP 15-ay043ur
In general, installing drivers in the past has always been a very unpleasant task, since you had to constantly look for them. To be honest, I always advise you to first use the samdrivers collection; I already wrote how to install the necessary Windows drivers at once, and the latest ones at that. But for those who like to think that everything was downloaded from the official website, here is the link:
http://support.hp.com/ru-ru/drivers/selfservice/HP-15-ay000-Notebook-PC-series/10862300/model/12221820
Select the operating system you need, in this case seven, and download whatever your heart desires.

This is how you can simply install Windows 7 on an HP 15-ay043ur laptop, naturally having a ready-made distribution kit, I will now embed these driver data into any of my builds.

With the advent of UEFI and the imposition of Windows 8 on everyone by pre-installing it on most new laptops, installing Windows 7 on a laptop has acquired some nuances. Fortunately, you can still find drivers for 7 for many laptops. So today an HP Pavilion g6-1200er patient was delivered to change the operating system from Windows 8 to Windows 7.
So, installing Windows 7 on an HP Pavilion g6 laptop consists of the following steps:

In this menu we see that in order to enter BIOS need to press F10.
The required driver for the optical drive was not found
During installation, an error appears stating “The required driver for the optical drive was not found. If you have a floppy disk, CD, DVD, or USB flash drive with this driver, insert the media. NOTE: If the Windows installation media is inserted into the CD/DVD drive, it may be removed while you complete this step." 
It occurs due to the fact that we have installation media (in this case, the flash drive is inserted into USB 3.0), and Windows 7 does not support USB 3.0 out of the box. And we need to either insert the media into USB 2.0, or, as in this case, switch the operating mode to USB 2.0.
Like this

If you don't have the " USB3.0 Configuration Pre-OS“Then feel free to move on.

Drivers for Windows 7 for this model of HP Pavilion g6-1200er laptops, fortunately, are available on the manufacturer’s website, namely.
Most laptop users are faced with situations where they need to reinstall the operating system, often while keeping the licensed Windows. This publication discusses several methods of how to reinstall Windows 7 on a laptop, and also talks about the nuances of the process of installing the OS on laptops from different manufacturers.
Restoring the system using a Windows 7 backup
Most mobile computer manufacturers create backup storage for 7 distributions or any other OS. Reinstalling Windows 7 on a laptop from these memory areas is done using built-in utilities.
To start the reinstallation, reboot your laptop and press:
- for Windows on an HP laptop on F11;
- on an ASUS laptop on F9, boot immediately when you start;
- for Windows 7 on a Lenovo laptop on F11;
- On an Acer laptop, the key combination Alt + F10 is suitable;
- for Windows 7 on a SAMSUNG laptop on F4.
After pressing the desired key, instead of the standard Windows 7 boot, the OS recovery interface will open:
After downloading the program, follow the instructions to restore Windows.
But remember that all settings will be reset, and data from the previous copy of the system may be deleted.
Reinstalling from disk
When reinstalling from a disk, remember that to restore the license you need to use a distribution kit with exactly the same OS as was installed previously. You can find out the version of the installed system on a sticker, which is usually located on the back of the laptop. By the way, the license key for your copy of Windows is also located there.

Remember that when you reinstall, a new operating system is deployed from the disk, and to avoid problems in the future, you should delete the data from the previous Windows.
This is accomplished by formatting the system partition, so take care in advance to transfer all the necessary data from the selected hard drive volume to install Windows. It is not advisable to transfer installed programs, since this will lose connection with the registry, and many of them may not start. Don't be lazy, install them again after replacing the OS.
The installation disk distribution does not include drivers for all laptops, so download the drivers for your device in advance from the manufacturer’s official resource. If this is not done, then after installation there is a high probability of the following problems occurring:
- The network card does not work;
- Wi-Fi does not work;
- Applications do not launch.
If you reinstalled the OS without this, then to troubleshoot network equipment you will have to download the driver distribution using another computer and transfer them using removable media, so before reinstalling, do not forget to play it safe and download drivers for the network card and Wi-Fi module.
To begin the installation process, insert the disc into the drive and restart your laptop. After your computer starts, open the boot menu and select boot from DVD.

This dialog is called up on most laptops using the F12 key, and on HP devices the combination F9 + Esc is used.
Often on older computers this function is missing, so you will need to open the BIOS and edit the boot priority yourself. To go to the BIOS on laptops, manufacturers use the following keys:
- Acer, Asus, Samsung, Lenovo - F2;
- hp - F10 + Esc .
If the brand of your device is not in this list, then find out the actual key for it on the window that loads when you turn on the PC.
The BIOS interface from different manufacturers is not similar in appearance, but the sequence of actions for changing the boot priority is almost identical. Navigation through the windows of a running BIOS of all versions is carried out using the arrows on the keyboard and the Enter, Esc, +, - keys.
Sequence of actions for BIOS AMI:

Sequence of action for BIOS Phoenix-Award:

Windows installation
After making a change to the BIOS and rebooting, a dialog will appear with the message: “Press any key to boot from CD or DVD.”

Further installation of Windows 7 is not difficult, do the following:
- Press any keyboard key.
- Wait until the file unpacker completes; a screen with the entry “Windows is loading files...” is displayed.

- In the dialogue " Windows installation» Specify the language and click on the Next button.

- In the window that appears, click on the large Install button.

- Select the version of the system to install that has a license code. You will need to enter it after reinstalling Windows 7.

- Agree to the licensing terms.

- Select installation method - " Full installation».

- Select the drive volume on which you are going to install the OS and prepare it by clicking on the item " Disk setup».
 There are situations when a reserved drive partition is present in the list; be sure to select another volume.
  If you have disks with a capacity of more than 250 GB, it is worth splitting them into several. Typically, a separate partition of up to 100 GB in size is allocated for system installation.
- Format the selected drive partition. A warning will appear that all information on it will be deleted. Confirm your consent, because you have previously saved all the necessary data. Wait for the installation to complete and click on Next.

- Wait for the installation process to complete, on average it lasts from fifteen to twenty-five minutes, the duration depends on the configuration of the laptop.

- Fill in the fields provided with your username and PC name.

- Protect your account with a password, or you can skip this step.

- Enter the key copied from the sticker on the laptop.

- Select security options.

- Set the date and time.

- If you have a network connection, specify the connection type.

Reinstalled Windows is ready to go. If you changed the boot priorities in the BIOS, return the hard drive to first place in the list, otherwise the computer will constantly try to start from the DVD.
Reinstallation from a flash drive
Many compact PCs, such as netbooks, do not have a DVD drive. Therefore, the question arises of how to properly reinstall Windows 7 on them. The answer is simple - use removable media.
To reinstall from a flash drive, you need to download the Windows 7 distribution image in ISO format and write it to this media using a special utility. Remember, in order to properly reinstall a licensed Windows system, you need to download a container with the same OS version. The flash drive itself must have a capacity of at least four gigabytes.
Burning Windows to media using the most popular utility among analogues Ultra ISO is performed according to the following algorithm:

The installation flash drive is ready, but to start the installation, you need to select " USB-HDD" How to set up the BIOS is described above, all steps are similar, you just need to select another entry from the available list. Further installation is no different from installing Windows 7 from DVD.
Often after reinstalling Windows does not work. To solve this problem, take another OS distribution and repeat the installation process. In addition, many users ignore the need to format the partition and reinstall the seven on a disk that already has an installed copy of the system. Avoid this as it can also cause problems.
Conclusion
This article covered reinstalling Windows 7 in several ways. If there is no backup copy, then this procedure should be carried out from a disk on which exactly the same version of the OS is recorded. Some laptops do not have a CD-ROM, so reinstallation can only be done using external media, for example, a flash drive.
Video on the topic
When you buy a new computer or laptop, you want it to work long and reliably. Before purchasing, check its serviceability, functionality and the presence of Windows installed on it.
But over time, the new system becomes cluttered with different programs and begins to slow down and freeze. It needs to be reinstalled. But how to do that? How to reinstall the OS, because there was no DVD included with the laptop.
In fact, to restore the system and cleanly install it on your computer, a DVD is not required. The ISO image of the operating system is located inside the computer, in a hidden partition of the Recovery hard drive.
How to install the system from a hidden HDD partition of an HP Pavilion laptop will be written below.

How to reinstall windows 7 on hp pavilion 15N211, 15N221 via BIOS.
How to install Windows 7 on an HP laptop via BIOS
Instructions for restoring Windows via BIOS
For an HP laptop model 15N211, 15N221, the instructions for restoring Windows via BIOS from a hidden partition of the Recovery hard drive will be as follows.
Turn on the laptop and press the F10 key to enter the BIOS.
When the BIOS boots, go to the System Configuration tab and go to Boot Options
A warning will appear with Yes-No options, select Yes.
Also on the System Configuration page, in the POST Hotkey Dely (sec) item, set the value 10 instead of zero.
Show more
Then exit the System Configuration section by pressing Esc.
And go to the Exit tab.
Here we select the Exit Saving Chandes item. When asked if we want to save, click Yes.
After this, the laptop reboots and displays a digital command code to go to the menu for working with the Recovery section. Type this code on your keyboard and press Inter.
After that, press the Esc key and you should see a menu. In which there will be a command F11 - System Recovery.
Attention. If you press F11 from this point, Windows will be reinstalled from the hidden partition through the BIOS. In this case, the old system will be deleted, the disk will be formatted, and all data on it will be destroyed.
Video Review: How to run Windows System Restore on an HP laptop.
This is how, starting with the F10 key, you can reinstall Windows from a hidden partition of your hard drive through the BIOS. If for some reason you were unable to do this, then you can leave a request for computer repair and setup in the city of Moscow through the website lanstroy.ru.
It might be useful to read:
- Resetting Firefox Settings Cleaning Firefox Resetting Add-ons and Settings;
- What is the rtf file format used for?;
- NUMBERS file extension Programs that open the NUMBERS file;
- How to open ODS files and what they are Converting ods to xls download the program;
- How to convert DJVU file to PDF file;
- State and immediate prospects for the development of the computer market;
- How to write posts for social networks Pictures of what your target audience is dreaming about now;
- Login to your mailbox Rambler Mail Rambler log in check your inbox;