Batch photo processing: step-by-step instructions. Lesson: Batch Processing Photos in Photoshop What is Batch Processing
Hi all! This time I'll show you some of the basics of automation in Photoshop along with their practical applications. We will create a complex action, build a Droplet based on it, and perform a batch editing operation on an entire folder.
Part I - How to Create an Action in Photoshop
Step 1 - Let's get started!
Not every Photoshop user is a designer. There are many people who need graphical tools that can make their life easier. If you are a photographer or webmaster, this tutorial will help you.
First, place all the photos you want to process in a separate folder. Then open any of these pictures.

We will use it to create Actions in Photoshop.
Step 2 — Setting up actions in Photoshop
To begin, open the Actions window (select Window> Actions or press Alt + F9). Let's create a new Action group.

After creating the group, let's create a specific action. Click on the leaf at the bottom of the Action panel. Let's call the new action "Vintage Halftone".

Once created, pay attention to the three small icons: stop, record and play. For the next step, the recording icon must be active.
Step 3 — Resizing the Image Using Image size
Let's build an action. I will explain how and what to do. Be careful and follow the instructions.
Once you have your photo open and the recording icon is active, start recording your steps.

The first step is to resize the image. Since I'm going to use photos in a web gallery I need to make them smaller. For this I choose Image> and set the width to 700px and check the box to keep the proportions. In addition, a checkbox is required Resample Image and choose Bicubic Shaper (best for reduction).
Do not resize the image using other methods (such as Free Transform). Because this will not work on vertical images.
Click OK and go to the next step.
Step 4 - Copy the image.
Now, it would be good to reset the colors with which we draw. To do this, you can simply use D on your keyboard.
Do not change colors using the color picker or eyedropper.

Then double click on the "Background" layer in the Layers palette. And click "OK"
Drag the layer to the icon "Great new layer", a copy of the layer will be created.
Make sure "Layer 0 copy" is selected and move on to the next step.
Step 5 - Add Diffuse Glow
The "Layer 0 copy" layer is selected and we are going to add a Diffuse Glow filter to it. This will increase the lighting and give a dramatic look to the image. Go to Filter>Filter Gallery and select Distort>Diffuse Glow. Set the values as shown below and click OK.

Step 6 — Changing Opacity and Merge Layers
Don't use the slider to change the opacity value because Photoshop will record each step at each percentage (100, 99, 98, 97...75) and we don't want that.

The resulting layer should be called “Layer 0 copy”.
Step 7 - Gaussian Blur Filter
Duplicate the “Layer 0 copy” layer as described above.

Make sure "Layer 0 copy 2" is selected and go to Filter> Blur> Gaussian Blur, set the radius to 2 pixels and click OK.
Step 8 - Change the Blending Mode of the copy.
Change the Blending Mode of the “Layer 0 copy 2” layer to Overlay.
If you want to try different blending modes, click on the Stop button in the Actions window and experiment! Then click Record, and select the desired blending mode.
Finally, set the Opacity value to 70%.

Step 9 - Create a layer fill
Now, let's add a black background to our work.
To do this, go to Layer >New Fill Layer > Solid Color, click OK and select color #000000.

Move the “Color Fill 1” layer to the very bottom.
Step 10 - Add a Layer Mask
Click on the "Layer 0 copy" thumbnail and select Layer > Layer Mask > Hide All.

Step 11 - Select the Layer Mask
Now we're going to create a random stroke on our photos.
After creating the layer mask, you should click on its thumbnail and then select everything by clicking Ctrl+ A on keyboard.

This is an important step, if you don't click on the layer mask thumbnail you will end up with an ugly result =)
Also, when you select everything, you cannot use the Marquee Tool and make a random selection. If you do this, Photoshop will only store the coordinates as exact numbers for that specific photo, and it won't work for any other.
Step 12 - Selection Transformation
Now select Marquee Tool in the tool palette. Right-click on the selection and select the option Transform Selection.
Pay attention to the top panel, there are two values W and H (this is the width and height, it should be 100%). Click on the small chain in the middle and change the values to 95%. This way you will reduce your allocation by 5%. Click on the checkbox and apply the transformation.

Step 13 - Create a Custom Border
Let's change the selection arbitrarily.
Make sure the "Layer 0 copy" mask is selected.
Then go to Select>Refine edge, and set the value as in the screenshot and click OK.

You should end up with something like this.
If you are working with a different image size, you should play around with the Refine edge values a bit.
Step 14 - Fill the Selection
Now fill the selection with white.
Reset the colors with the D key. Then select the Marquee tool from the Tools palette, right-click and select Fill... In the dialog box, set the settings as in the screenshot.

Finally, press Ctrl + D to deselect it.
Step 15 - Copy the actions
Now let's repeat the process of creating a custom border (steps 10 to 14), but this time on the "Layer 0 copy 2" layer.
These actions can simply be duplicated in the Actions window.
To copy steps, first select "Layer 0 copy 2". Stop recording.
Then select (in the Actions window) all the steps in the boundary creation process, i.e. from “Set Selection” to the step before Select “Layer 0 copy 2”.

Click the button on the right and select Duplicate. They will be copied.
Now simply drag the selected actions below the "Select "Layer 0 copy 2"" step. Start playing the selected fragments.
Finally, click on the last step in the Actions window and start recording.
Step 16 - Processing with Halftone Pattern
Then click on the layer mask thumbnail “Layer 0 copy.” Next, log in Filter>Filter Gallery, and go to Sketch>Halftone Pattern and set the values below, and then click OK.

Step 17 - Add a Photo Filter
Select "Layer 0 copy 2" in the Layers palette and then go to Create New Fill or Adjustment Layer > Photo Filter, select a color (#957345) and set the Density to 100%. Click OK.

Step 18 - Hue/Saturation
Afterwards, let's go Adjustment Layer > Hue Saturation, select the values as in the screenshot and click OK.

Step 19 - Fill a New Layer
In the layers palette, create a new layer and place it above all the others. Let's leave it as "Layer 1." Then Ctrl + A (select all) then select the Marquee tool, right click and select "Fill..." use the foreground color. Everything should be filled with black.

Step 20
Now add a Pattern Overlay effect to “Layer 1”. I use "Gray Granite" from the Grayscale Paper pack.
Step 21 - Rasterize the Layer Effect
Create another layer.
Then Shift+click on the “Layer 1” layer in the Layers palette to select both layers. And press Ctrl + E to combine them.

Step 22 - Change the Blend Mode and Opacity
Now change the Layer 2 Blending Mode to Multiply and the Opacity to 75%.
Step 23 - Flatten image
In the layers palette, select all layers. Right-click and select Flatten image. Finally, in the Actions window, you can click Stop.
That's all! Now we can apply these actions to any photos.

End of Part I – check!
Now it's time to check if your steps work correctly on another photo. To do this, open the photo, find our action (Vintage Halftone) and press the play button.
Before moving forward, it's a good idea to save the action itself.
To do this, select the "site" action set in the "Actions" window, and then go to the advanced options (the icon in the upper right) and select Save Actions... Enter a name for your action and save it anywhere.
Now you can move on to batch editing.
Part II - Batch processing of photos in Photoshop
Step 1 — Create a Droplet for Batch Processing
Droplets apply actions to one or more images, or even a folder if you drag them onto the droplet icon.
You can save the droplet anywhere and use it as many times as needed. To create a droplet, go to File > Automate > Create droplet... There you can see all the many options.
First select the source photos folder and save the droplet there.. For the destination folder I will select a different folder.

You can also customize the name of the resulting image by adding custom text, number sequence, extension, and clicking maximum compatibility. Once you have configured the droplet, click OK.
Step 2 - Working with the droplet.
Now open your images folder. Select and drag the desired images onto the droplet icon. You will see that Photoshop will automatically edit the selected images and save them to the specified folder.

Conclusion
Automating actions in Photoshop can sometimes save a lot of time. Future designers, webmasters and photographers should be able to use it.
I recommend trying these techniques with your photography =)
Batch processing of photos in Photoshop is a function that greatly simplifies the lives of people who, due to the nature of their work, are often faced with the task of processing a large number of images/photos (designers, photographers).
In one of the previous lessons, I told you what actions are, how to create them, and how they can be used to facilitate the process of image processing.
When it comes to processing several images of the same type, we can simply apply a specially recorded action several times. But when there are a huge number of images, even a partially automated process can take a lot of your time.
Batch processing is used in cases where it is necessary to perform a number of sequential identical operations with a large number of images. For example, when you need to unify in size, perform the same type of color correction, increase sharpness, add a signature/logo and save several hundred photographs taken.
At its core, batch photo processing in Photoshop is the process of mass application of an action to a library of images.
You can use absolutely any actions that you recorded or downloaded from the Internet.
Let's see in practice how batch photo processing works in Photoshop.
Preliminary preparation
Let's say we have a folder that contains n number of photos, each of which we want to subject to the same type of processing using the selected action. My folder with photos is called “Sources”, it contains 30 photos (initially there were 6, I just multiplied them for clarity).

We also need to create a final folder in which the finished processed photos will be saved. I named the output folder “Processed”.
I'll record a simple sequence of operations to reduce the size of an image and do some color correction, and then we'll try to apply the resulting action to all the photos in the Sources folder.
Let's get started
Stage 1 - Create an action
Launch the program, open the “Actions” palette – Alt+F9.
Create a new action by clicking on the icon at the bottom of the Actions palette (similar to the new layer icon).

We give the action a meaningful name. Click “Record”.

A red circle will light up at the bottom of the Actions palette, which means that recording has started, and all your further actions will be recorded by the program.
Open one of the photos from the “Sources” folder – Ctrl+O.

Reduce the image size. The original size of the photo was 7776*7456, which is a lot for web graphics, for example.
Go to the menu: Image – Image size, or press Alt+Ctrl+I.
Let's say I want the width of all images to not exceed 500px. Set the image width to 500px.

Notice in the Actions panel that as we perform actions, they are recorded as part of the action we created.
Now let's convert the image to black and white and set a slight tint of color.
Switch to the layers palette “Layers” – F7.
Create a new adjustment layer by clicking on the black and white circle at the bottom of the layers palette.

Select “Black and White” from the context menu.

Hold Ctrl and select both layers in the “Layers” palette.
Right-click on the selected layers and select “Convert to smart-object”.

Right-click again and select “Rasterize layer”.

Soften the contrast a little - go to the menu: Image – Correction – Hue/Saturation (Image – Adjustments – Hue/Saturation) (Ctrl + U).
Increase the brightness by about +25.
Now go to the menu: Image – Corrections – Variations (Image – Adjustments – Variations).
The two upper windows show the source and the future processing result, which changes depending on your actions, that is, you can immediately see what will happen after applying color correction, without applying any settings yet.
Click, for example, “More yellow”, then “More blue” and “Lighter” in the column on the right - “OK”.

That's it, now save the image: File – Save for web & devices (Save for web).

I chose the Jpeg format and set the quality to 70 to compress the photos by weight.

We specify the “Processed” folder, which we previously created, as the directory for saving the finished photo.

After saving the photo to the final folder, stop recording the action by clicking on the “Stop” button (the leftmost square) at the bottom of the operations palette.

Our action is ready. Now all that remains is to apply it to the remaining 29 photos.
Stage 2 – Batch photo processing
We can close the first photo.
Go to the menu File – Automate – Batch Processing (File – Automate – Batch).

Select the action you just created (or any other) from the list.
We indicate the path to the folder with raw photos, in another line we select the directory where we want to save the processing results (we created a folder for finished photos in advance).
In our specific case, we put checkboxes as in the picture so that during photo processing we are not disturbed by unnecessary dialog boxes.

I draw your attention to the fact that you check the box “Ignore “Open” commands” only when an opening command is recorded in your action.
Since actions can be completely different and may not contain commands for opening an image and saving it, carefully read the program prompts when checking boxes.
After setting all the settings, click “Ok”.
If you have a lot of photos, you can go have a coffee while the program does all the work for you.
Processing 30 photos took about 1 minute, and in the end I ended up with a folder with automatically processed photos.

Thus, the method of batch processing photos in Photoshop is that you edit just one photo, record the action, and then you can apply this action to hundreds of photos without any intervention on your part and very quickly.
You can make it even simpler - download ready-made actions, if they suit your tasks, there are a lot of them on the Internet, and then the process of mass photo processing will be even simpler and faster.
That's all!
In this lesson, we learned what batch photo processing is in Photoshop and how to use it to simplify the routine process of mass image processing.
I hope you learned something new and interesting for yourself from this lesson!
Often you have to process a large number of images. In this case, each subsequent one is processed in the same way as the previous one. It is not at all necessary to do everything manually with each new photo. It is enough to record all your actions once in the action and start batch processing.
Step 1
First of all, you need to prepare. Place the original images in the "Originals" folder. It's better to save them just in case. We also create a “Results” folder.
Step 2

Step 3
Note! During the processing process, you cannot process individual areas of the image, including selections. This will result in the same places being selected and processed in all images.

Step 4
You can now use the recorded action for all photos in the Originals folder. Go to the menu File - Automation - Batch Processing (File - Automate - Batch). Now select our folder with the originals and set other settings.

Note!!! If you have a very large number of photographs to process, it is better to divide them into small groups.
When a novice photographer is faced with the need to process a large number of photographs, the question inevitably arises: How to reduce the time spent on processing, how to automate routine operations?
To do this, Adobe Photoshop has several tools in its arsenal: operations or actions, scripts or scripts, and droplets.
Operations, otherwise called action, macros or macro commands are recorded and saved actions on an image that can be applied to another image and also used in batch processing. Actions are also the basis for creating droplets.
Droplet is a small application, a kind of program that automatically processes all images dragged onto it. The droplet icon can be placed, for example, on the desktop and folders with images can be dragged onto it for processing.
Scripts or scripts are also programs, but written in one of the scripting programming languages. The use of scripts allows you to automate operations for which it is impossible to write an action, that is, the capabilities of scripts are much wider. The only negative is that to write scripts you need to master certain programming languages, for example, Java Script.
In this article we will record a simple action and look at how to use it in batch processing using the command Image processor
As an example, let's take the method of toning photographs using color fill in blend mode Hard light. Here is the original photo
First, let's create a set into which we will place the operation to be recorded. To create a set, click on the folder icon in the Operations palette. In the dialog box that opens, enter the name of the set.


Now, with active typing, click on the icon for creating a new operation

In the dialog box that opens, enter the name of the operation. If necessary, assign a color and keyboard shortcut so you can quickly launch the operation. Click Write down to start the recording process. Now in the palette Operations The recording icon will be active and turn red.


Before you start recording, it is advisable to plan all the steps and write them down on paper. A well-planned action works without errors and the stability of its operation does not depend on which version of the program is used, Russian or English. A properly recorded action will work in any environment. If this is not the case, it means that methodological errors were made during planning and recording, for example, the names of layers or channels were written down.
Now let's create an adjustment layer Color. To do this, click on the icon for creating an adjustment layer in the palette Layers, then select a layer from the list Color.


In the dialog box that opens, select the desired color. It is necessary in advance, even when preparing for recording, to write down the values of this color along the RGB channels, so that you can then enter it and immediately get the desired color.

Change the layer blend mode to Hard light

We will get something like this

Now you need to weaken the effect of the correction layer on the skin. Skin is known to be lightest in the red channel of the image. Let's make the adjustment layer mask active. To do this, press the key combination CTRL+\. The active layer mask will be surrounded by a frame

Now let's load the red channel of the image onto the mask. To do this, go to the menu Image - External channel. In the dialog box that opens, set the following settings Layer - Background, since it is from the background layer that we will use the red channel. Channel - Red, you need to check the box on the right Invert, since for the mask we need just the inverted red channel, Overlay - Normal, Opacity - 100%. After completing the settings, click OK. The adjustment layer's effect is now rendered through a mask based on the inverted red channel, which looks like this:


We got a slight toning effect on the image

You can now stop recording the action. Then, returning the image to its original state using the palette Story, you need to check the operation of the action. Now it can be used for batch processing.
Batch processing is best done using a script Image processor. It can be found in the menu File - Scripts - Image Processor.

Or, which is much more convenient, you can run the image processor from the module Bridge, having previously selected photos for processing in it. In Bridge Image processor is in the menu Tools -Photoshop - Image Processor.

Set Batch Processing Options in the Dialog Box Image processor is not difficult. You need to select the location to save the files, the format and quality of saving, as well as a set of actions and the action itself that needs to be applied to the selected images.

I spent the whole evening studying automatic processing. I share the instructions below.
Batch Reduce Photos in Photoshop
In the Photoshop graphic editor, the Action tool is provided for automatically processing photos according to a predetermined algorithm.
1. Create two new folders and give them names in Latin! For example, Begin and End. If the folder name contains Cyrillic characters, an error may appear during batch reduction. In one of the folders, for example, Begin, we put all the photos that need to be reduced. All photos must have the same resolution, for example JPG.
2. Call up the Action palette located in the Window menu.
3. Create a new set of commands in the Operations palette. To do this, click the Create new set button. You can assign any name to the set of commands, for example, SmallPhoto. Next, in the created new set of SmallPhoto commands, we create a new action, for example, called Size750. To do this, click the Create new action button. We immediately launch Record.
4. In the process of reducing images, their quality deteriorates and in order to minimize losses, it is better to use the Bicubic Sharper interpolation method from the Edit – Preferences – General menu.

5. Open one of the original photos intended for reduction from the File-Open menu.
6. In the Image – ImageSaze menu in the Resolution window, set the value to 72 pixels/inch.

7. To reduce the size of the photo, execute the command File – Automate – Fit Image (File-Automation-Change Dimension). In the dialog box that opens, set the necessary Width and Height parameters, for example, 750 and 500.

8. In the File menu, open the Save for Web command (Save for the Web and devices...). Set the quality level for the photo, the extension (should be .JPEG) and click Save. In the menu that opens, specify the path to the End folder. In the menu that appears, click “OK”. Close the photo without saving the editing results.

9. In the menu Edit – Preferences – General (Editing-Settings-Basic) we return the interpolation back to Bicubic.
10. Stop recording with the Stop button – the button with a blue square at the bottom of the Action palette.

11. In the End folder, delete the photo that got into it while recording the Action command.
All of the above steps need to be done only once to write down the command you need. To permanently batch reduce files to a specified size, you will only need to perform the following step.
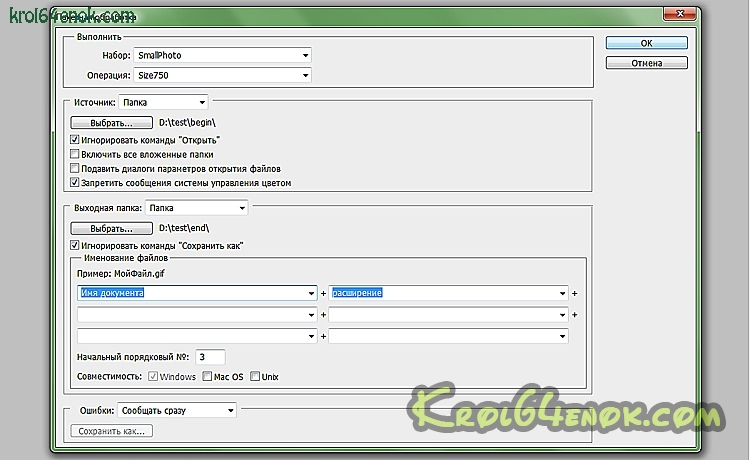
12. Open the menu File – Automate – Batch (File-Automation-Batch Processing). In the Set section, select the SmallPhoto command set we created and the Size 750 command. In the Source window, select Folder. Click the Choose button and specify the folder with the processed photos Begin. In the Destination column, select Folder and indicate the folder where the processed photos will be saved, that is, the End folder. Check the boxes next to Override Action “Open” Commands (Ignore “open” commands); Suppress Color Profile Warnings; Override Action “Save as” commands. In the Starting serial# window (the number of photos processed at a time), set the value to 3. The File naming column is filled in as you wish, as is the method for notifying errors. Next, you only need to click OK, and the program will finish working. The thumbnail photos can be found in the output folder you specify, in our case the End folder.
P.S. After writing this labor-intensive article, I found an easier way to batch resize photos. To change the size, go along the path File-Scripts-Image Processor (I’m not sure that this function is present in all Photoshop builds). Then everything is very simple, select the source folder and destination folder, check the Resize box and enter the parameters W, H (in pixels), click Run.

P.S.S. The 12-point instructions outlined above may be useful for more complex photo processing than just resizing. By analogy with the described example, you can record any operation you are interested in (for example, a set of commands Open image - Auto contrast - Auto tone - Smart sharpening filter - Save image) for batch processing.
It might be useful to read:
- Walkthrough of the game - Tricky test;
- The most terrible horrors. Creepy stories. The most terrible horrors Camp horror story coffin on wheels;
- Watches for children: types, their features;
- Cannot save the document form (invoice) in Excel format - the "Save" and "Save As" buttons are not available;
- How to resize cells in Excel and make them the same How to change the width of all columns in Excel;
- Basic settings of the AutoCAD workspace How to create a custom coordinate system in AutoCAD;
- Translation of numbers in positional number systems;
- Voltage resonance in a series oscillatory circuit;