We find out the reasons why the BIOS does not see the hard drive. Bios does not see bootable USB flash drive Ami bios does not see bootable USB flash drive
Those who have at least once independently reinstalled the operating system on their computer or laptop know about the procedure for setting up booting from a CD or flash drive. That is, from the media from which the installation will be carried out. Most instructions say that this is done through the Boot device priority menu.
In modern versions of BIOS and UEFI this menu item does not exist, or rather it has a different name. This is why some may experience difficulty setting up boot priorities from removable media to install an operating system due to the missing Boot device priority menu in the BIOS.
How to configure booting from a flash drive or disk if there is no Boot device priority item in the BIOS?
To begin with, it’s worth trying to do this without entering the BIOS, since many motherboards and laptops have an implementation through which you can select the boot source.
entering the boot menu for laptops
To do this, when turning on, try quickly pressing the F8, F9, F11, F12 buttons. Naturally, not simultaneously, but alternately. That is, when you turn it on for the first time, quickly and repeatedly press F8. If nothing works and Windows starts loading, then reboot and try F9 and so on. In this case, the boot disk or flash drive must already be inserted into the computer.
A window like this should appear:

Boot menu

The second version of the BOOT menu
Here you use the arrow keys to select a DVD drive or your flash drive and confirm booting from the selected device with the Enter button.
If none of the buttons described above did not work and the boot menu did not appear, then you will have to go to the BIOS and look there for something similar to the images below. These are possible options for presenting the BIOS tab, where boot priority is configured.

Option 1 - Using the mouse in the upper right corner, drag the DVD drive or flash drive to the first place


You decided to install Windows: you recorded a digital copy on a flash drive, configured the BIOS, rebooted your computer or laptop, but for some reason the installation did not start. What the heck? Why doesn't the BIOS see the bootable USB flash drive? It seems like everything was done correctly...
There are 2 most likely reasons here. The first is that the BIOS does not display the flash drive because it is not bootable. Second, you haven’t configured the BIOS quite correctly.
Although there is one more nuance - your BIOS is too old. It does not support USB drives, and therefore does not see them. In this case, you can install Windows from a disk.
As for the first two reasons, we will look at them in more detail.
Did you write the bootable USB flash drive correctly?
The fact is that it is not enough to simply copy files. In this case, it will not be considered bootable. This is why the BIOS does not see your flash drive. It must be recorded only using special programs. There are plenty of them, but personally I use UltraISO. Why? Because she:
- Free (with a 30-day trial period).
- Records both Windows 7 and Windows 8.
- Easily writes images to a 4 GB flash drive (some programs only support USB drives with a capacity of 8 GB and higher).
And most importantly: creating a bootable USB flash drive in UltraISO is as easy as pie. First, you need to install the program (link to the developer’s website) and connect the USB flash drive to your laptop or computer. And after that there are only a few steps left to complete:

During recording, all information from the USB flash drive will be deleted. The program will also warn you about this. Therefore, if there is important data on it, copy it to another location.
Correct BIOS setup
If you did everything according to the instructions, then rest assured that the USB flash drive was written correctly. And now it's really bootable. Try it - it may work to install Windows.
Therefore, restart your laptop or computer and go into the BIOS. To do this, you need to press a certain button several times. Most often this is Del or F2, although it may be different (depending on the motherboard model and laptop brand).
Next, you need to go to the tab whose title contains the word “Boot”. This is where you configure the boot priority of devices when you turn on your PC or laptop. By default, the hard drive boots first (First Boot Device), followed by the drive. In this case, you need to put the flash drive (USB-HDD) in first place, and temporarily lower the hard drive (Hard Disk) to second.

When exiting the BIOS, be sure to save the new settings! To press the button that is responsible for the “Save and Exit” item.

That's all. Now, if the USB flash drive is connected to a computer or laptop and the BIOS is configured correctly, Windows installation will begin.
P.S. If this is all too complicated for you, then you can go to the Boot Menu. This is one of the BIOS options, which is designed specifically to quickly configure booting from a flash drive.
P.S. If the BIOS stubbornly refuses to recognize the USB flash drive, then it may be damaged. But before you throw it away, read it. Perhaps everything will work out and it will last a couple more years.
Today I will tell you how to enable booting from a flash drive in the BIOS of various manufacturers. No matter what version you have, the order of body movements will be as follows:
1. We insert our bootable USB flash drive into the USB connector of your computer. I recommend inserting it into a port located directly on the motherboard, i.e. from the back of the system unit.
2. Turn on the computer and press the key Delete(or F2) to get into the BIOS. Depending on the manufacturer and BIOS version, other keys (Esc, F1, Tab) may be used, so you need to carefully read the prompts on the screen.
In Bios, we can only navigate between tabs using the keyboard.
Below I will describe this process in detail using the most commonly used BIOS versions as an example.
Attention! Keep in mind that if you are installing the operating system from a flash drive or CD and have selected the boot device in the BIOS rather than in the boot menu, then after the first automatic reboot of Windows you will need to enter the BIOS again and return booting from the hard drive. If this is not done, autoboot from a flash drive or CD will work again, and Windows will begin the first stage of the procedure again installations.
Setting up Award Bios to boot from a flash drive
Award Bios:
First, let's check if the USB controller is enabled. Let's go to “Integrated Peripherals”. Use the arrow on the keyboard to move down to the “USB Controller” item. Press the “Enter” key and select “Enable” in the window that appears (also using “Enter”). Opposite “USB Controller 2.0” there should also be “Enable”.
 Exit this tab by pressing “Esc”.
Then we go to “Advanced BIOS Features” – “Hard Disk Boot Priority”.Now in my example the hard drive comes first, but the flash drive should be there.
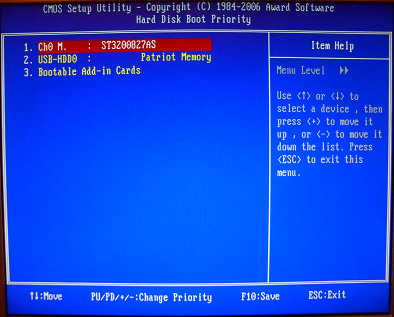 We stand on the line with the name of our flash drive (Patriot Memory) and raise it to the very top using the “+” key on the keyboard.
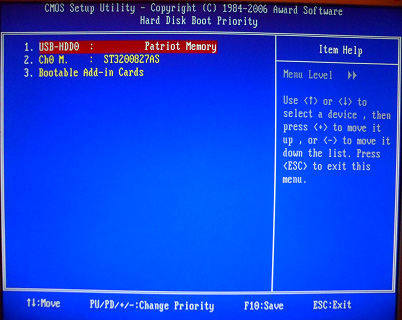 We leave here by pressing “Esc”.
Setting up AMI Bios to boot from a flash drive
If, after entering Bios, you see such a screen, it means you have AMI Bios:
 First, let's check if the USB controller is enabled. Go to the “Advanced” – “USB Configuration” tab.
 Opposite the items “USB Function” and “USB 2.0 Controller” should be “Enabled”.
 If this is not the case, go to this line and press the “Enter” key. From the list that appears, select “Enabled” (also using “Enter”).
Then exit this tab by pressing “Esc”.
Let's go to the tab “Boot” – “Hard Disk Drives”.
 Now my hard drive is in first place, but I need to put a flash drive here. We go to the first line, press “Enter” and in the window that appears, select our Patriot Memory flash drive.
 It should be like this:
 We leave here via “Esc”.
Select “Boot Device Priority”. Here, the first boot device must be a flash drive.
 Press Esc.
Then we exit the Bios, saving all the settings made. To do this, go to “Exit” – “Exit & Save Changes” – “OK”.

Setting up Phoenix-Award Bios to boot from a flash drive
If, after entering Bios, you see such a screen, it means you have Phoenix-Award BIOS :
 First, let's check if the USB controller is enabled. Go to the “Peripherals” tab – opposite the “USB Controller” and “USB 2.0 Controller” items there should be “Enabled”.
 Then go to the “Advanced” tab and opposite “First Boot Device” set “USB-HDD”.
 After that, exit the Bios, saving the changes. To do this, go to “Exit” – “Save & Exit Setup” – press the “Y” – “Enter” key
 That's practically everything you need to know in order to boot from a flash drive. In my article, I described the process of setting up the BIOS of the most popular versions: Award And AMI. The third example presents Phoenix-Award Bios, which is much less common.
The described procedure may differ slightly in different BIOS versions. But the main thing is that you understand the principle of setting itself.
By the way, I would also like to add: in order to choose which device to boot your computer from, it is not necessary to change the settings in the BIOS. You can immediately call up a special menu after turning on the computer to select boot devices (this can be done by pressing the F8, F10, F11, F12 or Esc key). In order not to guess with the keys, look carefully at the monitor immediately after turning it on. We need to have time to see an inscription like this: “Press Esc to selest boot device.” In my case, it was necessary to press “Esc”.
Every system administrator should know how boot computer from USB flash drive. Most often, this skill is needed when installing an operating system. After all, the Windows distribution does not have to be located on a CD. And, for example, it won’t even be possible to install Windows on a netbook any other way, because... it usually does not have a disk drive.
Today I will tell you how to set boot from a flash drive in the BIOS of various manufacturers. Regardless of which version you have, the procedure will be as follows:
1. We insert our bootable USB flash drive into the USB connector of the computer. It is advisable to insert it into a port located directly on the motherboard, i.e. from the back of the system unit.
2. Turn on the computer and press the key Delete(or F2) to get into the BIOS. Depending on the manufacturer and BIOS version, other keys (Esc, F1, Tab) may be used, so you need to carefully watch the prompts on the screen.
In Bios, we can navigate through tabs and lines only using the keyboard.
Next, I will describe this process in detail using the example of different BIOS versions.
Setting up Award Bios to boot from a flash drive
Award Bios: First, let's check if the USB controller is enabled. Let's go to “Integrated Peripherals”. Use the arrow on the keyboard to move down to the “USB Controller” item. Press the “Enter” key and select “Enable” in the window that appears (also using “Enter”). Opposite “USB Controller 2.0” there should also be “Enable”.
  Exit this tab by pressing “Esc”.
Then go to “Advanced BIOS Features” – “Hard Disk Boot Priority”. Now in my example the hard drive comes first, but the flash drive should be there.  We stand on the line with the name of our flash drive (Patriot Memory) and raise it to the very top using the “+” key on the keyboard.
  We leave here by pressing “Esc”.
Now on the line “First Boot Device” press “Enter”. We selected “CD-ROM”, but we need to set “USB-HDD” (if suddenly loading from a flash drive does not work, come back here and try setting “USB-FDD”). Let the second device be “Hard Disk”.  Exit this tab by pressing Esc.
Now exit the BIOS, saving the changes. To do this, click “Save & Exit Setup” – press the “Y” – “Enter” key. 
Setting up AMI Bios to boot from a flash drive
If, after entering Bios, you see such a screen, it means you have AMI Bios: First, let's check if the USB controller is enabled. Go to the “Advanced” – “USB Configuration” tab.
 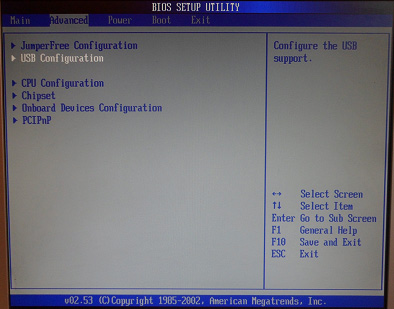 Opposite the items “USB Function” and “USB 2.0 Controller” should be “Enabled”.
  If this is not the case, go to this line and press the “Enter” key. From the list that appears, select “Enabled” (also using “Enter”).
Then exit this tab by pressing “Esc”.
Go to the “Boot” – “Hard Disk Drives” tab.  Now my hard drive is in first place, but I need to put a flash drive here. We go to the first line, press “Enter” and in the window that appears, select our Patriot Memory flash drive.
  It should be like this:
  We leave here via “Esc”.
Select “Boot Device Priority”. Here, the first boot device must be a flash drive.  Press Esc.
Then we exit the Bios, saving all the settings made. To do this, go to “Exit” – “Exit & Save Changes” – “OK”. 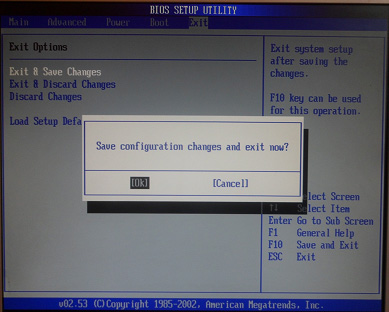
Setting up Phoenix-Award Bios to boot from a flash drive
If, after entering Bios, you see such a screen, it means you have Phoenix-Award BIOS: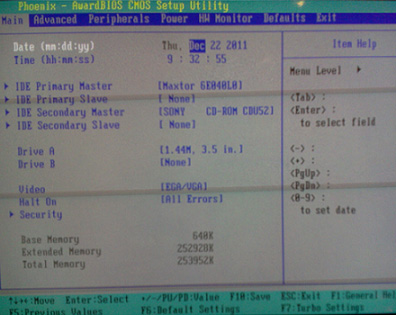 First, let's check if the USB controller is enabled. Go to the “Peripherals” tab – opposite the “USB Controller” and “USB 2.0 Controller” items there should be “Enabled”.
  Then go to the “Advanced” tab and opposite “First Boot Device” set “USB-HDD”.
  After that, exit the Bios, saving the changes. To do this, go to “Exit” – “Save & Exit Setup” – press the “Y” – “Enter” key
  That's practically everything you need to know in order to boot from a flash drive. In my article, I described the process of setting up the BIOS of the most popular versions: Award And AMI. The third example presents Phoenix-Award Bios, which is much less common.
The described procedure may differ slightly in different BIOS versions. But the main thing is that you understand the principle of setting itself.
By the way, I would also like to add: in order to choose which device to boot your computer from, it is not necessary to change the settings in the BIOS. You can immediately call up a special menu after turning on the computer to select boot devices (this can be done by pressing the F8, F10, F11, F12 or Esc key). In order not to guess with the keys, look carefully at the monitor immediately after turning it on. We need to have time to see an inscription like this: “Press Esc to selest boot device.” In my case, it was necessary to press “Esc”. 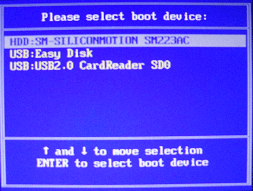 If on your computer BIOS UEFI, and you need to boot from a flash drive - you can check it out.
If you need reset forgotten user password using a bootable USB flash drive - how to do it.
Modern laptops are getting rid of CD/DVD drives one after another, becoming thinner and lighter. At the same time, users have a new need - the ability to install an OS from a flash drive. However, even with a bootable USB flash drive, not everything can go as smoothly as we would like. Microsoft specialists have always loved to present their users with interesting problems. One of them is that the BIOS may simply not see the media. The problem can be solved by several sequential actions, which we will now describe.
In general, there is nothing better for installing an OS on your computer than a self-made bootable USB flash drive. You will be 100% confident in it. In some cases, it turns out that the media itself is not made correctly. Therefore, we will look at several ways to make it for the most popular versions of Windows.
In addition, you need to set the correct parameters in the BIOS itself. Sometimes this may be the reason why a drive is not in the list of drives. Therefore, after we figure out how to create a flash drive, we will look at three more ways to configure the most common BIOS versions.
Method 1. Flash drive with Windows 7 installer
In this case we will use .

This method is suitable for Windows 7 and older. To record images of other systems, use our instructions for creating bootable flash drives.
In the following instructions you can see ways to create the same drive, but not with Windows, but with other operating systems.
Method 2: Setting up Award BIOS
To enter Award BIOS, press F8 while the operating system is loading. This is the most common option. There are also the following entry combinations:
- Ctrl+Alt+Esc;
- Ctrl+Alt+Del;
- Delete;
- Reset (for Dell computers);
- Ctrl+Alt+F11;
- Insert.
Now let's talk about how to properly configure the BIOS. In most cases, this is precisely the problem. If you have Award BIOS, do this:

It might be useful to read:
- How to install Windows directly from a hard drive using different methods?;
- Laptop RAM DDR3;
- Prevent the installation of unwanted programs using AppLocker;
- Bios does not see bootable USB flash drive Ami bios does not see bootable USB flash drive;
- Birthdays on iPhone, iPad and Mac: how to add and enable reminders How to set up reminders on iPhone 5s;
- Xiaomi External Batteries;
- BlockLauncher Pro for Android (updated latest version) Download block launcher for version 0;
- Fuel game won't start;