Installing windows 10 from hard drive. How to install Windows directly from a hard drive using different methods? Hard drive partitioning
How to install Windows from a hard drive? Install XP/Vista/7/8/10
Hello everyone, in the next Computer76 blog article I will show you how to install Windows from a hard drive. Yes, the usual Windows installation process for a user requires the presence of an optical drive, installation disk and/or flash drive with the operating system. What if there is none of this?
To all dissatisfied “professionals”. This article is not written for a guru. That’s why I try to describe everything in detail with the appropriate links. And I will immediately divide the article into several parts.
To install Windows from a hard drive, all we need is the Internet and a more or less functional operating system.
Why and when is this needed?
- Firstly, I have already mentioned the main reasons. The Windows disk may be in any of a number of dusty drawers, or just out of reach. The disk drives of some desktop users no longer work or work poorly. And this is generally a problem for laptop owners...
- Further. No need to gut the BIOS settings. What are all these keys F2, F10, DEL, settings? Advanced Settings, changing boot devices... Do you need it? No, of course not. You can install Windows from your hard drive right now.
- You will be protected from the need to urgently transfer the necessary files to various media before the upcoming formatting: this can be done later, slowly, in comfortable conditions.
But, naturally, before installing Windows from a hard drive, we still have to get the installation files themselves somewhere. That is, download Windows from the network. To do this, you can refer to the section or specifically to the article
If much remains unclear, refer to the article
However, you can right now download the image directly from a Microsoft server of ANY VERSION using a simple file:
There are no viruses at any stage of working with the file. I checked it personally and I also packed it. When choosing a Windows version, the antivirus should respond to the user's choice - this is normal. Sequentially select:
- version
- capacity of the future system
All that remains is to indicate the location where you will upload the Windows image. I use this utility in more detail in the article
.
What do you need to install Windows from your hard drive?
I’ll give you a set of programs that will be useful to us.
- Actually, downloaded from the Windows network
- Program Daemon Tools for working with images (how to work with it is described in the article). The 7-zip archiver can also unpack the image, but stock up on an image “reader”
- Program EasyBCD to work with the boot record so that the computer correctly displays input into the new system.
- You can immediately stock up for your device. First download them from the network and put them in a folder, for example, Drivers. In any case, you can't go anywhere without drivers. However, this is not necessary; the operation can be done later (if the Windows installation files see the network card). I'll risk skipping this step for now.
ATTENTION
The described technique is not suitable for computers with Windows operating systems of the NT family (up to and including Windows XP). EasyBCD they will not work as we need. In any version, you don’t have to look!
Everything seems...
I won’t get excited about where to find a Windows image for a long time. You have already read my articles and we take it as an axiom that the Windows image is already on the computer. Don't push it too far. Personally, I throw all temporary files directly onto the Desktop.
Now you need to prepare your hard drive to accept the new system in order to install Windows from the hard drive. We will consider the option when the system will be installed second to the existing one. However, the method is quite applicable if the new copy of Windows overwrites the previous one. Now I do not advise you to do this. But one condition is unshakable - the presence of a free partition on the hard drive from which the installation files of the new Windows will be copied. , described in detail in the blog article of the same name. I did this on the same laptop.
So, the hard drive is broken, the Windows image is on the computer. And now, actually, how to install Windows from a hard drive.
Install programs Daemon Tools And EasyBCD on the computer so as not to be distracted later. You know how to install programs, I think.
Now let's look at the process of installing Windows from a hard drive using a specific example.
A laptop arrived with Windows Vista pre-installed and ready to go. The operation of the system turned out to be unstable, the system itself was badly beaten, and it was decided to install a second Windows 7 system. As you can see in the photo below, I had already divided the hard drive into three logical partitions. One of them is now occupied by Vist (naturally WITH), the second one was reserved by the hostess for files stored on the computer (disk D), and the third (F) reserved by me for Windows 7 - I pinched off a small piece from the storage.
START – Computer – Service(in the toolbar) – Folders settings…– tab View– set Show hidden files, folders, drives
Let's launch Daemon Tools. Let's show her the path to the Windows 7 image.

Then copy all the Windows installation files from the virtual drive and transfer them to the free partition that is reserved for the future Windows 7, that is, to drive F in my case. I put everything on drive F. It took me about 7 minutes to copy.


Let's try installing Windows from a hard drive
Let's launch EasyBCD with administrator rights. We are greeted by the settings window. Everything here is in English, but I'll walk you through it. Make sure you are in the menu Add New Entry:

Lower right in Removable/External media select tab WinPE. In field Name (Name) enter the name of the system. I designated it as "Seven". In field Path (Path) by clicking on the binoculars with the folder to the right of the field to fill, indicate the path to the file boot.wim, which is located in the newly created folder sources on disk F.
That is, the path on my laptop looked like:
F – sources – boot.wim
In general, this is what I ended up with:

Let's finish the settings. We need a button on the right Add Entry (Add).
ATTENTION
Clicking the button View Settings (Current menu) you can see what the bootloader menu will be like. This will be the first window that will allow you to select your operating system. Look at it before you make changes. It can be edited later. But now it should look something like this:

You will see labels numbered Entry#1 and Entry#2 (Entry 1 and Entry 2) in the same order. Will load first Seven, second - Vista. That is, after completing the settings and the inevitable reboot, you will see this window:
 But that comes later.
If you managed to click something, click on the button on the left Edit Boot Menu (Edit Download Menu)

And delete incorrect entries. You can swap the loading order of the buttons Up And Down(Up And Down), delete selected unnecessary records with the button Delete, change the loading wait time from 30 sec. to 0. In general, play to your taste and admire the result after a reboot. If you made changes in this menu, save using the button below Save Settings (Save).
Are you all ready? Go. Don't close anything and just reboot.
The installation took me less than 10 minutes. As you will see for yourself, installing Windows from a hard drive is very fast.
After the installation of Windows 7 is completed, the boot menu will look like this:

Windows 7 is installed.. but the word Seven is in the way
Let's remove it using the same EasyBCD. Return to Vista, launch the program and enter the menu Edit Boot Menu:

P.S.
At some point, one of the systems may become boring... In my example, Vista is almost completely dead. It will be easy to remove. Just log into the new system (mine is Windows 7) and:
- Format the entire logical drive with Vista under Windows 7. All data will be destroyed! It may not be possible to do this using Windows tools; you will have to use the program . You can find out how to work with it in the article.
- however, in some cases, especially for devices with a pre-installed OS, you cannot do without a special disk to remove an unnecessary system. We will look at working with such disks in another article.
- using a program already installed on Windows 7 EasyBCD remove the Vista entry from the bootloader. How to do this is clear from the written article.
P.P.S. EasyBCD will not only allow you to boot operating systems directly from your hard drive. With its help you can:

any disk directly in the boot menu
Good luck to all of us
Read: 2,717
The Windows 10 operating system is excellent software, which includes the best functional solutions of all previous versions. It is also worth noting that this version looks quite nice, is easy to use and fast to work with. It is interesting that now some people have a desire to understand the question: ? It turns out that the developers have created several variants of this software.
Many users who own fairly powerful and modern personal computers or laptops decide to switch to the presented version of the OS and wonder how to install Windows 10 from a disk? We will try to understand this issue, taking into account all aspects of the process and the pitfalls of this matter.
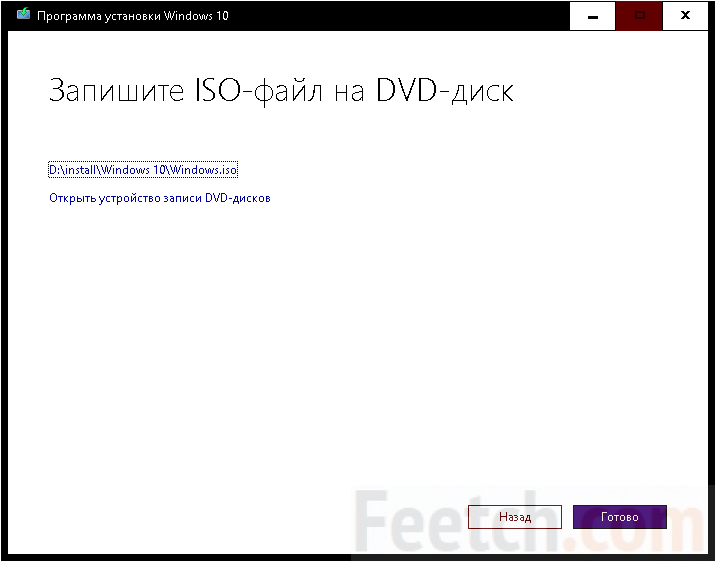
The most convenient way is to create a disk for installing the presented OS using the special “Astroburn” application. You need to launch the software, go to the “Image” section and click on the “Path to image file” button. Then select the OS file and click on the “Open” button. After that, check the box next to “Check” and click on “Start recording”. At the end of the process, you will have a disk ready to install Windows 10.
Installation of Windows 10 from the disk will begin after the optical media is inserted into the drive. After this, you need to restart your personal computer or laptop. After the PC turns on, you need to press and hold the “Boot Menu” key to launch the “Boot Menu”. It is usually called up using the “F8”, “F9”, “F10”, “F11”, “F12” buttons.

After turning on the special menu, select the DVD drive by using the “up” and “down” keys, and then press “Enter”. Now the computer will boot from the specified “DVD”, and accordingly the Windows 10 OS installation process will begin.
Start of OS installation and software bit depth
Once the installation disk boots, the user will need to click on a button to start the installation process. It is important to do this in a couple of seconds, otherwise another reboot will occur. Although the PC will restart several times later, do not rush to press the keyboard buttons so as not to interrupt the installation process.
If the installation disc comes with both 32-bit and 64-bit versions of Windows 10, the user will be prompted to make a choice. To do this, you can also use the “up” and “down” arrows, and press “Enter” to confirm your selection. After this, the “Install Windows” window should appear.
Now you need to select a language. All Russian-speaking residents and citizens of CIS countries in most cases decide to choose the “Russian” language. Please note that there may not be a choice as such if you are using the Single Language installer. Moreover, you will not be able to add a new language version in the future, since the SL build does not support the extension.

A field for entering the license key will then appear. If the key is available, you can enter it and click on “Next”. If you don’t have a key, it’s better to click on “I don’t have a product key.” Subsequently, you will be able to activate the system using a key or any method, like another activator.

The next window is where you will have to select the OS version: Home or Professional. After making your selection, click on “I accept the license terms” and click “Next”.
Selecting the installation type for Windows 10 OS
Of the two types of installation of Windows 10, we select “Custom”, since it implies a clean installation of the software on the hard drive. If you only want to restore the functionality of the OS, which means you already had it installed, then select another item. In any case, if you selected “Russian” at the previous stage, you can proceed through this window without any problems, since in addition to the name there is also a comment.
Setting up drive partitions
Now a window appears showing the available hard drive partitions. We delete all partitions except the largest one, where user files are stored. After that, select “Unallocated space” and click on “Next”. Having specified the type of file system, carry out formatting and go to “Next”.
This stage involves copying installation files from the disk to the solid-state drive. As soon as the copying is completed, the personal computer or laptop will restart several times and then the installation will continue again.
Now you need to configure certain system parameters responsible for user control. Everyone chooses for themselves which parameters to disable and which to leave in working order.

The PC will restart again and the installation will continue. But keep in mind that if you are installing the OS on an old device that does not have an updated BIOS, it may turn out that the installation will start from scratch. In this case, you need to restart the device and go to the boot order settings and at this stage select the hard drive, not the drive. You actually don't need it anymore, since all the files have already been transferred to the HDD.
Working with an account
This stage is one of the simplest, as it involves creating a user account. But here it is important to choose the right parameters:
- Password;
- Pin;
We have already written detailed instructions if you missed this step during the installation process. But if you compare the complexity of the processes, then setting the parameter at this stage is much easier, so it’s better not to delay.
Completing the installation of Windows 10 OS
At the very end, the operating system completes the installation and shows the user welcome screens with different content.
The problem of data storage occurs over time for every user, and many solve it by purchasing an additional hard drive. HDDs are inexpensive and are great for storing large amounts of information. You can easily install multiple hard drives into a computer case to increase the available space, but you not only need to insert a new solid-state drive, but also configure it correctly. The computer does not see the hard drive immediately after it is connected by wires to the motherboard, and in the Windows operating system you need to take several steps to correct this situation.
Why doesn't my computer see the new hard drive?

The Windows 10 operating system does not allow you to install a new hard drive into your computer and immediately start working with it. Before you start using a new drive, you need to check whether it works and is detected by the system. There are several reasons why the computer does not see the new hard drive:
- The disk is not installed correctly or is incorrectly connected to the motherboard and power supply;
- The hard drive does not work due to mechanical damage;
- There were problems detecting the device by the operating system.
Making sure that the Windows 10 operating system sees the hard drive and you can start setting it up is quite simple. To do this, right-click on the start button in the lower left corner and select the “Device Manager” line. Next, a menu will open in which you need to double-click with the left mouse button on the “Disk devices” section. 
Find the new one that was connected to the computer in the list of available disks and check its status:
- If it is not displayed, you should check that the HDD wires are connected correctly to other computer components;
- If there is a red or yellow exclamation mark next to it, it means that there are problems with media identification and you should fix them (most often in this situation you will need to download separate drivers for your hard drive model);
- If there are no extra icons next to the new hard drive, it means that it is connected normally and no problems have been identified.
When the hard drive is connected normally and information about it is available in Device Manager, you should proceed to setting it up.
How to set up a new hard drive in Windows 10
Setting up a new hard drive in the Windows 10 operating system is quite simple. If it is detected correctly, you must do the following to make the drive available for data storage:

If you plan to regularly use the new hard drive, be sure to do so during operation, otherwise the drive will quickly become unusable. If you wish, after the initial settings, you can always return to the Disk Management menu and create a new volume on your hard drive, format it for a different file system, or change the drive letter.
Most laptops come with a recovery sector, on which the system is already hardwired. It is very rare to find models that come with a version of FreeDOS. If there is a recovery sector, then the operating system in 99% of cases is already installed. And you don’t need to rack your brains about how to install Windows 10 on your computer. Nevertheless, a certain percentage of people have already paid a hefty sum for a licensed distribution and want to save a little (if this is at all possible after the Crimean events).
It is not customary to send a DVD today. Instead, the distribution kit is posted on the store’s website in the form of an image. You just need to burn the project on your local computer. Honestly, it’s hard to think of a reason why you can’t do all the procedures from a USB drive, but if you really want to...
Image
Someone will buy a ready-made image in the Microsoft store, but we decided to create it using the Media Creation Tool utility. A new computer is always a problem, but not a virtual one. Why burn a disk with an operating system if you can create an image? Drives are unpopular now because they consume a lot of energy, work slowly, and take up a lot of space. Usually the installer is stuck on a flash drive, but today we agreed to talk only about blanks. So let's get started!
The image is created by the utility. We just need to indicate that we want to create media and select a storage folder. In the future, this file can be used to burn any blank. The utility will gradually pull up the distribution from the official website.
This process is slow. It takes forty minutes or more, so let’s see how to burn through the project for now. The same application, at the end of its activity, will immediately offer to burn the disk.
But if this simple option does not suit you in some way, or the image is already available (downloaded from the store), then there are other ways of developing events. Media Creation Tool will delete unnecessary data before closing.
How to burn the installation disc
Rather than downloading Ultra ISO, we would recommend paying attention to the Windows USB/DVD Download Tool. If only because this tool is specifically designed for the purpose stated above. After downloading the auxiliary application, you also need to install it. Do not pay attention to the inscription saying that the software is for the seventh version. Eyewitnesses say that this miracle is good for ten.

The process will not be long, no choice is given, and the process ends with a message stating that the installation of the product is complete.

In the meantime, our image with the operating system is just finishing being created, therefore, soon it will be possible to test the mechanism in action. The appearance of the application is somewhat extravagant with a contrasting theme. Apparently, the developers wanted to create something beautiful, but this is what they got.

Burning the image
We are confident that readers will easily cope with the utility's interface. In the second step, you will be asked to choose between a flash drive or a DVD drive so that the application can create bootable media. Therefore, you can proceed directly to the installation process.
Installation on a new computer
Don’t forget that you need to change the settings in the BIOS; let’s set DVD as the first boot device. Without this, the system will not start.

We see that the image is combined (multi-boot disk). This is what was set in the Media Creation Tool. You need to install the version that meets the system requirements. First of all the processor:
- x86 – 32 bits.
- x64 – 64 bits.
Let's launch! The traditional Windows logo will appear, followed by the language settings screen, which we, with the permission of our readers, will skip.

After a couple of screens, the meaning of which is obvious, you will be asked to enter a key. Installing Windows 10 is possible without this. Just click "I don't have a key." This will be correct, because it will be possible to get to know the system a little before purchasing it. There is nothing worse than installing Windows 10 on a laptop and realizing that there is not enough RAM or the hard drive is slow. According to our observations, this system works faster than the seven and plays 3D games better. And no setup is required at all.

We see that in addition to bit depth there are some other options. Regular users should be interested in the first three. Keys for them are sold in stores; those left over from the seventh versions are not suitable. Therefore, the installed package will not be able to be activated as if we were switching to ten. After July 29, 2016 this is not possible. But the installer did not accept keys from the sevens before.
The next few screens are of no theoretical value, so we go straight to the installer. There will be two options:
- Update.
- Selective.
In our case, we need the second one and only it.

Hard drive partitioning
Windows 10 is installed on an NTFS partition with a size of 40 GB or more. It’s not worth taking less, and even that’s not enough. Ideally you should leave 100 GB. Gradually, the space will be eaten up for various purposes. A blank hard drive looks like this.

You just need to create a new main partition in this place. Please note that the system will take 500 MB for itself. Everything will happen completely automatically after you click the create button. You just need to indicate the size. This is what it looks like after all the operations have been completed.

You need to install Windows on the main partition. Click next. Further step-by-step instructions do not make sense; usually the disk has a bootloader that does not interfere with installation, even if the media is in the drive. You can rest for the next 40 minutes. Although on some machines the process takes much less. The installed instance of the system will need to be activated through the system menu, but Windows will remind you of this, so you should not worry about your own future in this regard.
We are all already accustomed to the fact that Windows 10, both when it was released a year and a half ago and when new major system updates were installed, is distributed across the global Internet. In 2015, when the release took place, many large telecom operators sometimes noted close to maximum loads on their data transmission channels, because hundreds of thousands of computers immediately began to receive updates over the Internet. However, as before, it is not always possible to install an operating system over a network; sometimes it is necessary to install it on a “clean” hard drive.
Installing Windows 10 from DVD or USB
If you need to install Windows 10 on a new computer without an operating system or a “clean” hard drive, you still need to remember about the ability to burn a boot disk, or rather a DVD, because the size of the system has become significantly larger since the days of Windows XP. Also, as before, it is possible to create a bootable USB flash drive. Nothing has changed except that now, as a rule, you can no longer find a boot disk in the store and you will have to download the image yourself from the official Microsoft website and burn it to media.
To install Windows 10 from a disc, you will need to burn a bootable disc, which can be done using most free programs, such as UltraISO. You just need to point the downloaded image to burn and start the process. After completion, you will need to check whether the disc has been recorded. What should I do next to be able to boot my computer from the DVD? As before, you should press F2 or Del when the computer starts to boot, enter the BIOS and there in the Boot section select the boot priority from DVD or USB. With USB everything is about the same; record it using UltraISO, for example.
Actually, everything will go on like in the good old days, when Windows discs were sold in stores in our cities on every corner. Then we didn’t have to download operating system images and burn them to disks, everything was simpler. On the other hand, now cases of disruption of the normal operation of the Windows operating system have become so rare that no one really needs a clean installation anymore. Also, most people have stopped assembling computers themselves and are buying ready-made units with a pre-installed operating system. Also, laptops and tablets, as well as 2-in-1 devices, where you can’t really experiment, are becoming increasingly popular.
It might be useful to read:
- How to install Windows directly from a hard drive using different methods?;
- Laptop RAM DDR3;
- Prevent the installation of unwanted programs using AppLocker;
- Bios does not see bootable USB flash drive Ami bios does not see bootable USB flash drive;
- Birthdays on iPhone, iPad and Mac: how to add and enable reminders How to set up reminders on iPhone 5s;
- Xiaomi External Batteries;
- BlockLauncher Pro for Android (updated latest version) Download block launcher for version 0;
- Fuel game won't start;